LG Inform Plus IAR and RoPA Help Guide
Table of Contents
- What are they?
- Utilising the RoPA/IAR Module
- Introduction
- Choosing how your organisation is going to use the tool
- Creating a new RoPA or IAR for your organisation
- Edit RoPA and/or IAR offline and upload changes
- Adding a record online
- Viewing and editing your IAR and/or RoPA
- Sharing your IAR
- Creating Privacy Notices for RoPA records
- Need more help?
1) What are they?
An Information Asset Register is a record of all the information held by an organisation. An IAR helps an organisation understand the information it holds, identify ownership and responsibilities and assists in identifying and managing areas of risk associated with those assets.
The RoPA is a document that organisations are required to maintain under the General Data Protection Regulations (GDPR) that came into force in May 2018.
LG Inform Plus’s existing Records Retention Tool describes each type of record that an English council is likely to hold to meet legal and business records management requirements. You can download a spreadsheet of pre-populated information for each record type and use this to help build the Records Retention Schedule that your council is required to hold. For GDPR, record types have been broken down in greater detail and more standard information has been pre-populated.
This information forms a template which you need to supplement with your local
information to form your council’s full RoPA or IAR. The RoPA deals with records (assets) containing personal information and special information which may require additional security to comply with GDPR.
LG Inform Plus lets you:
- download a template RoPA and/or IAR
- upload and download a spreadsheet of your RoPA and/or IAR
- maintain your RoPA and your IAR online
- Create and save a privacy notice for any record type that is in your RoPA
- Copy a link to a public version of your IAR
- Share your IAR with other LG Inform subscribed organisations
The RoPA/IAR tool is built by and for a community of local authorities working with the Local Government Association (LGA). Legal and records retention guidance is provided by Invicta Law and Kent County Council and delivered via the Records Retention and RoPA/IAR Tools. We expect tools and data to be refined as experience builds up across the community of local authorities.
Your record managers and legal team should use the data provided as a guide but you MUST ensure that your own authority’s experts review and approve your retention schedule and RoPA/IAR.
Back to top2) Utilising the RoPA/IAR Module
To utilise this module, you will need to sign-in to LG Inform Plus (http://about.esd.org.uk/). If you have not previously registered, use the "Register" option first to register with your council email address.
Your council needs to be subscribed with LG Inform Plus to use this tool. If you don’t have access after sign in, contact lginformplus@local.gov.uk or the support team at support@esd.org.uk.
Once you have signed in, follow these instructions to get a RoPA and/or an IAR that has generic record type information pre-populated but contains empty fields for information that is specific to your council.
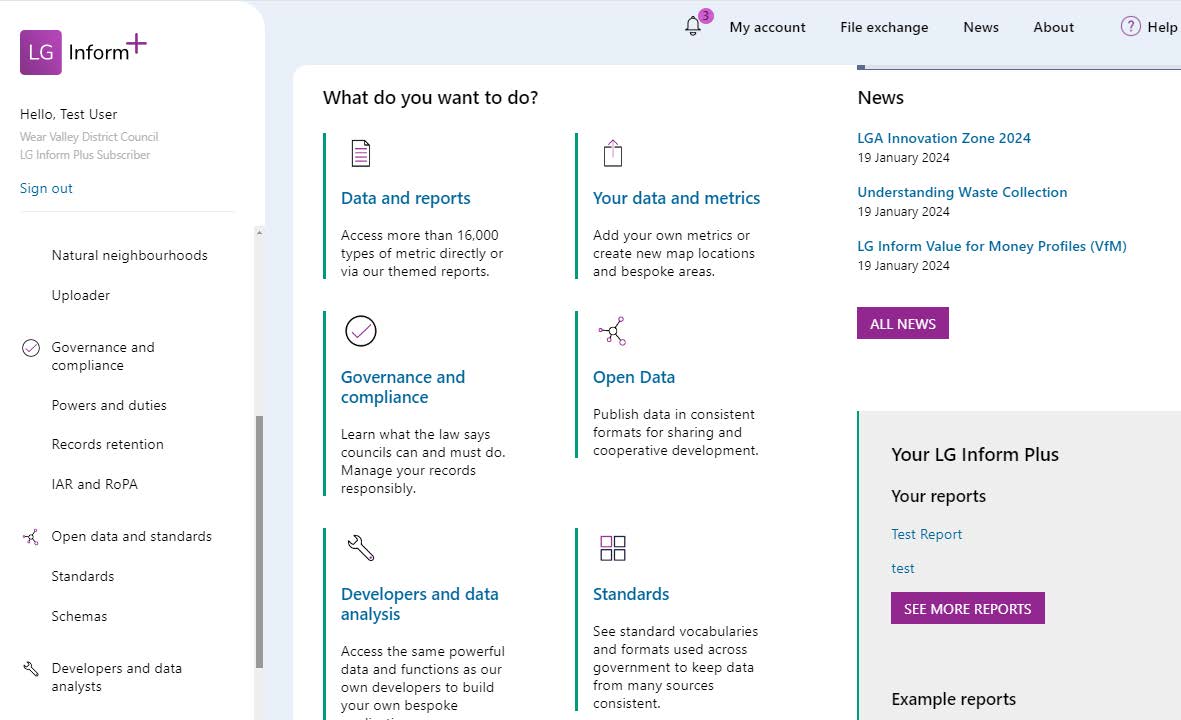
First, click on the ‘IAR and RoPA’ link in the side navigation or the ‘Governance and compliance’ heading, shown in the image below:
Back to top
3) Introduction
By clicking on the ‘Governance and compliance’ link users are taken to a ‘Hub’ page which outlines each of the modules: Powers and Duties, Information Asset Register (IAR)/ Record of Processing Activity (RoPA) and Records retention.
The section on Information Asset Register (IAR) and ‘Record of Processing Activity (RoPA)’ provides you with introductory information, such as the requirements of GDPR and the functions which are available with the tool to help you create and maintain your IAR and/or your RoPA.
This page also contains functionality and links to get users started with each module.
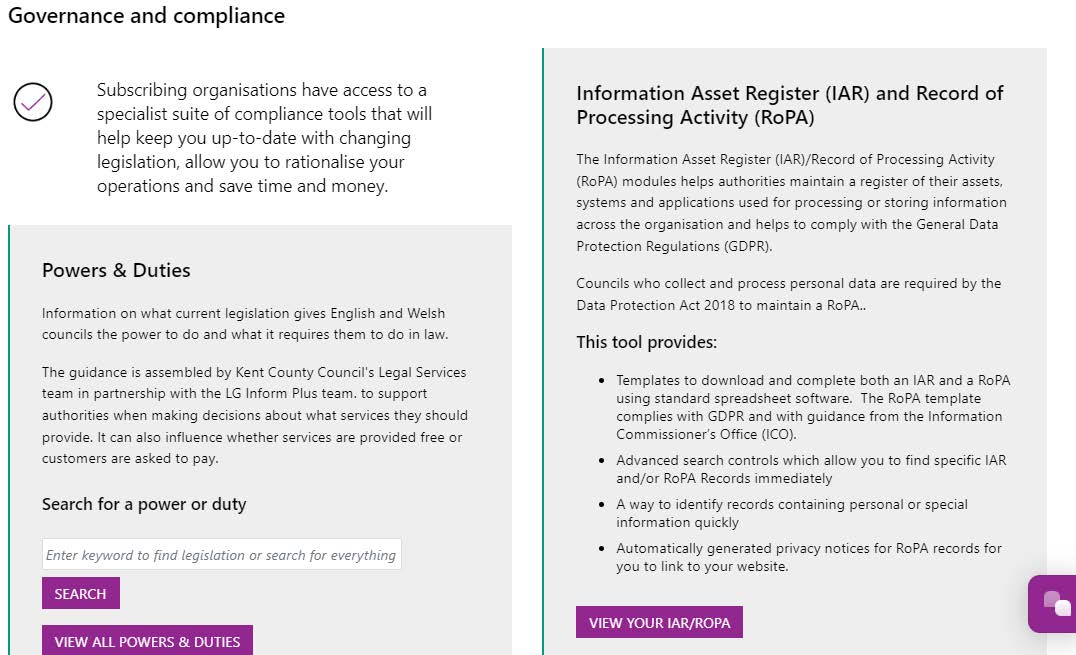
Note: there is a ‘Chat’ icon if users need specific help:

Back to top
4) Choosing how your organisation is going to use the tool
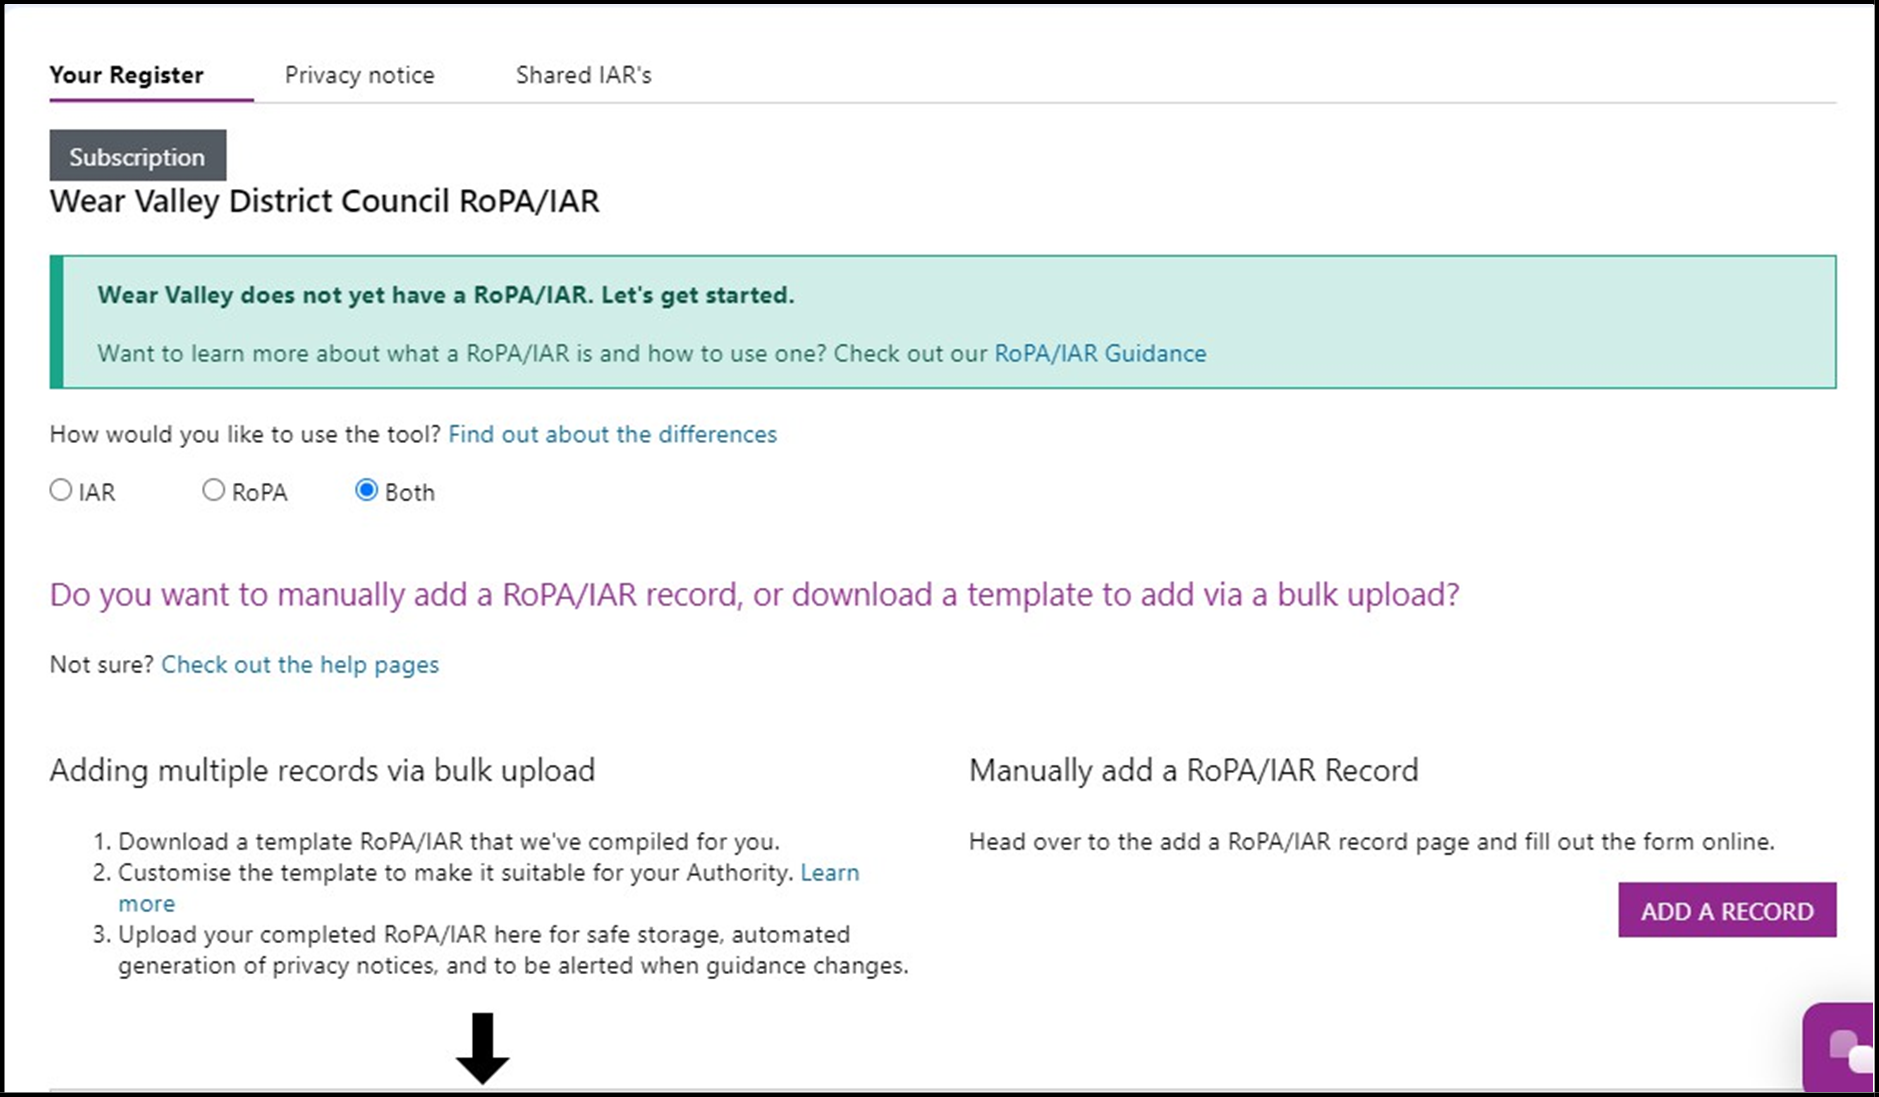
Select ‘View your IAR/RoPA’ from the Governance and compliance hub page or IAR/RoPA from the left hand menu. If your organisation has not already created n IAR and/or RoPA in LG Inform Plus you are presented with a page with a wizard to help you get started.

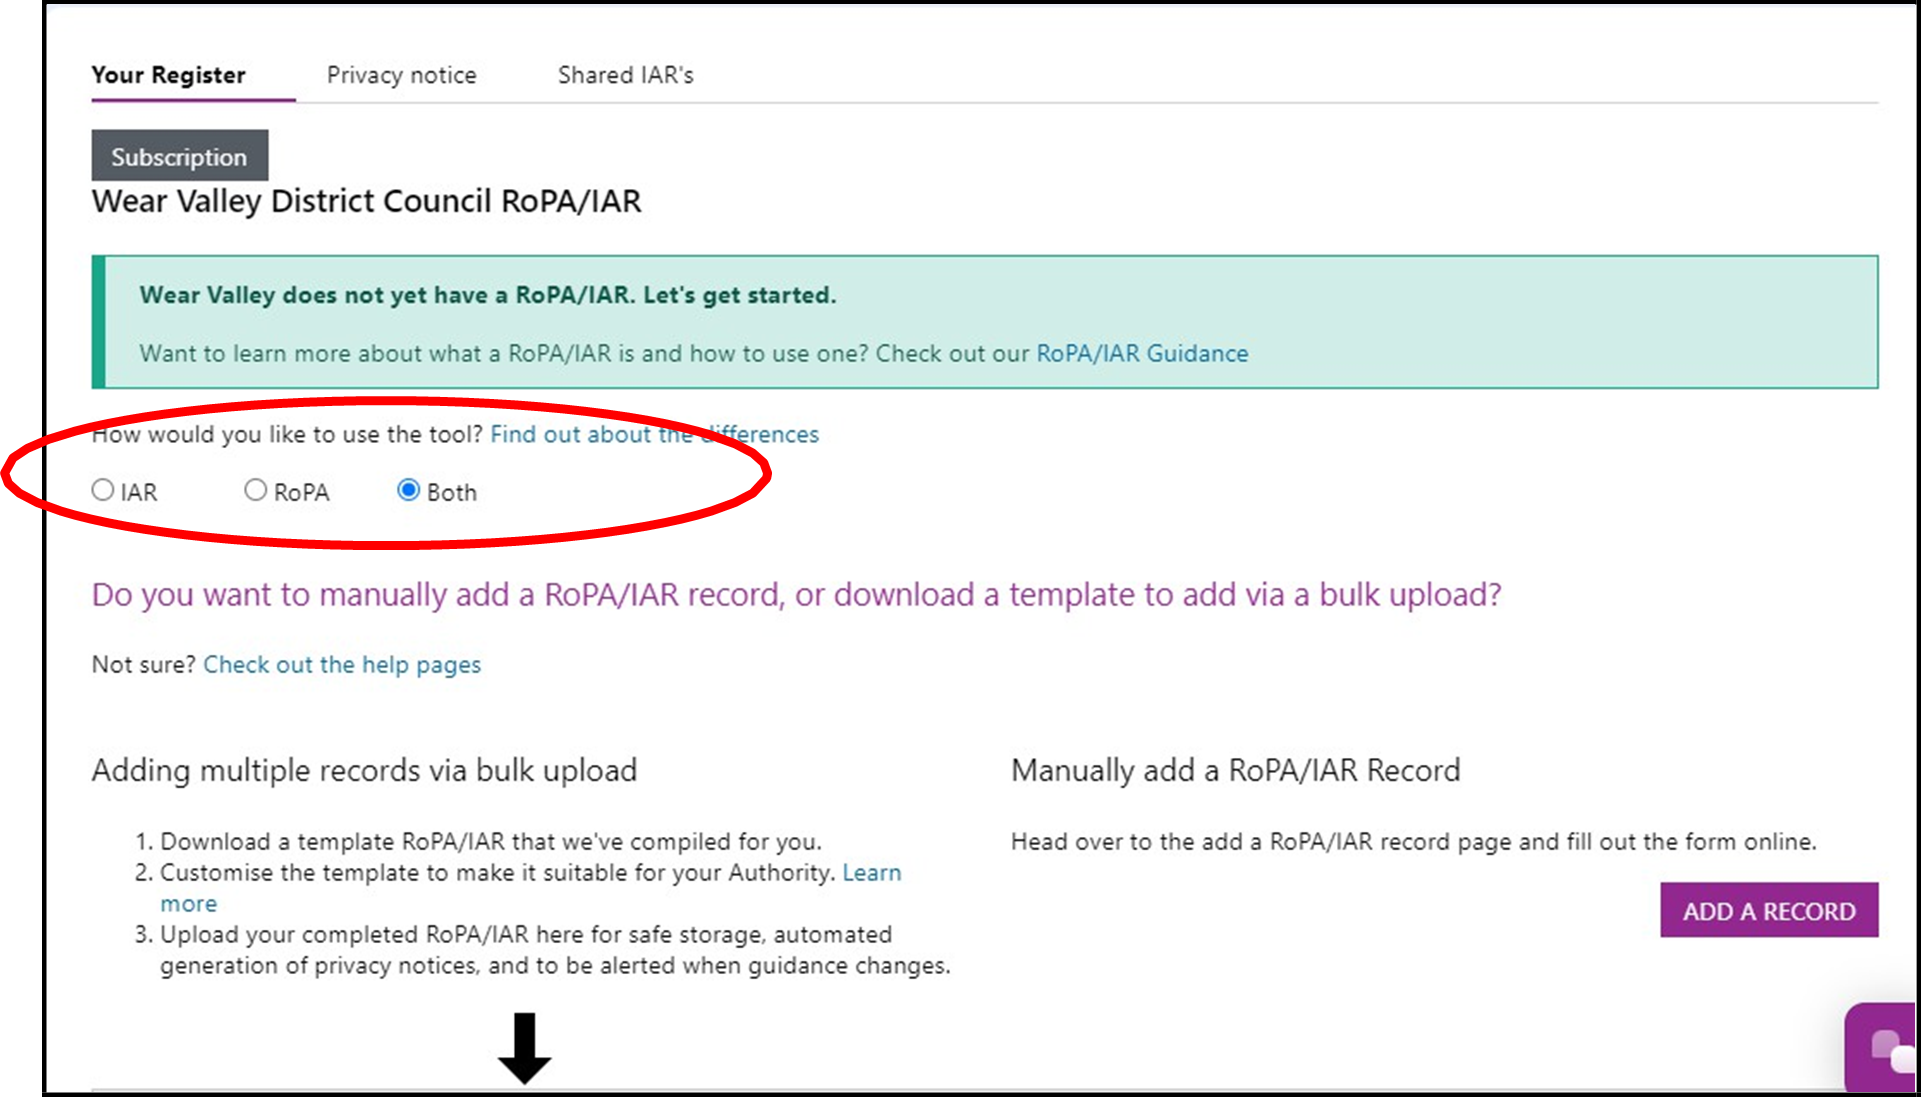
First you need to choose whether you are going to use LG Inform Plus for your RoPA, your IAR or for both.
Don’t worry – you can choose one or both now and change this later. It may just mean you have to add in some more information.
To choose which you are going to use you simply need to click one of the radio options outlined in red on the screenshot above. The default option is ‘Both’ but you can change this.
Back to top
5) Creating a new RoPA or IAR for your organisation
From the wizard page You can either add an individual record to start creating your RoPA and/or IAR (see later in this guide) or download a template which you can use to fill in the relevant information against multiple records before uploading them to LG Inform Plus to create your RoPA and/or IAR.
Before you download the template you can filter the record types to be included. Filters which you can choose are shown in the image below:
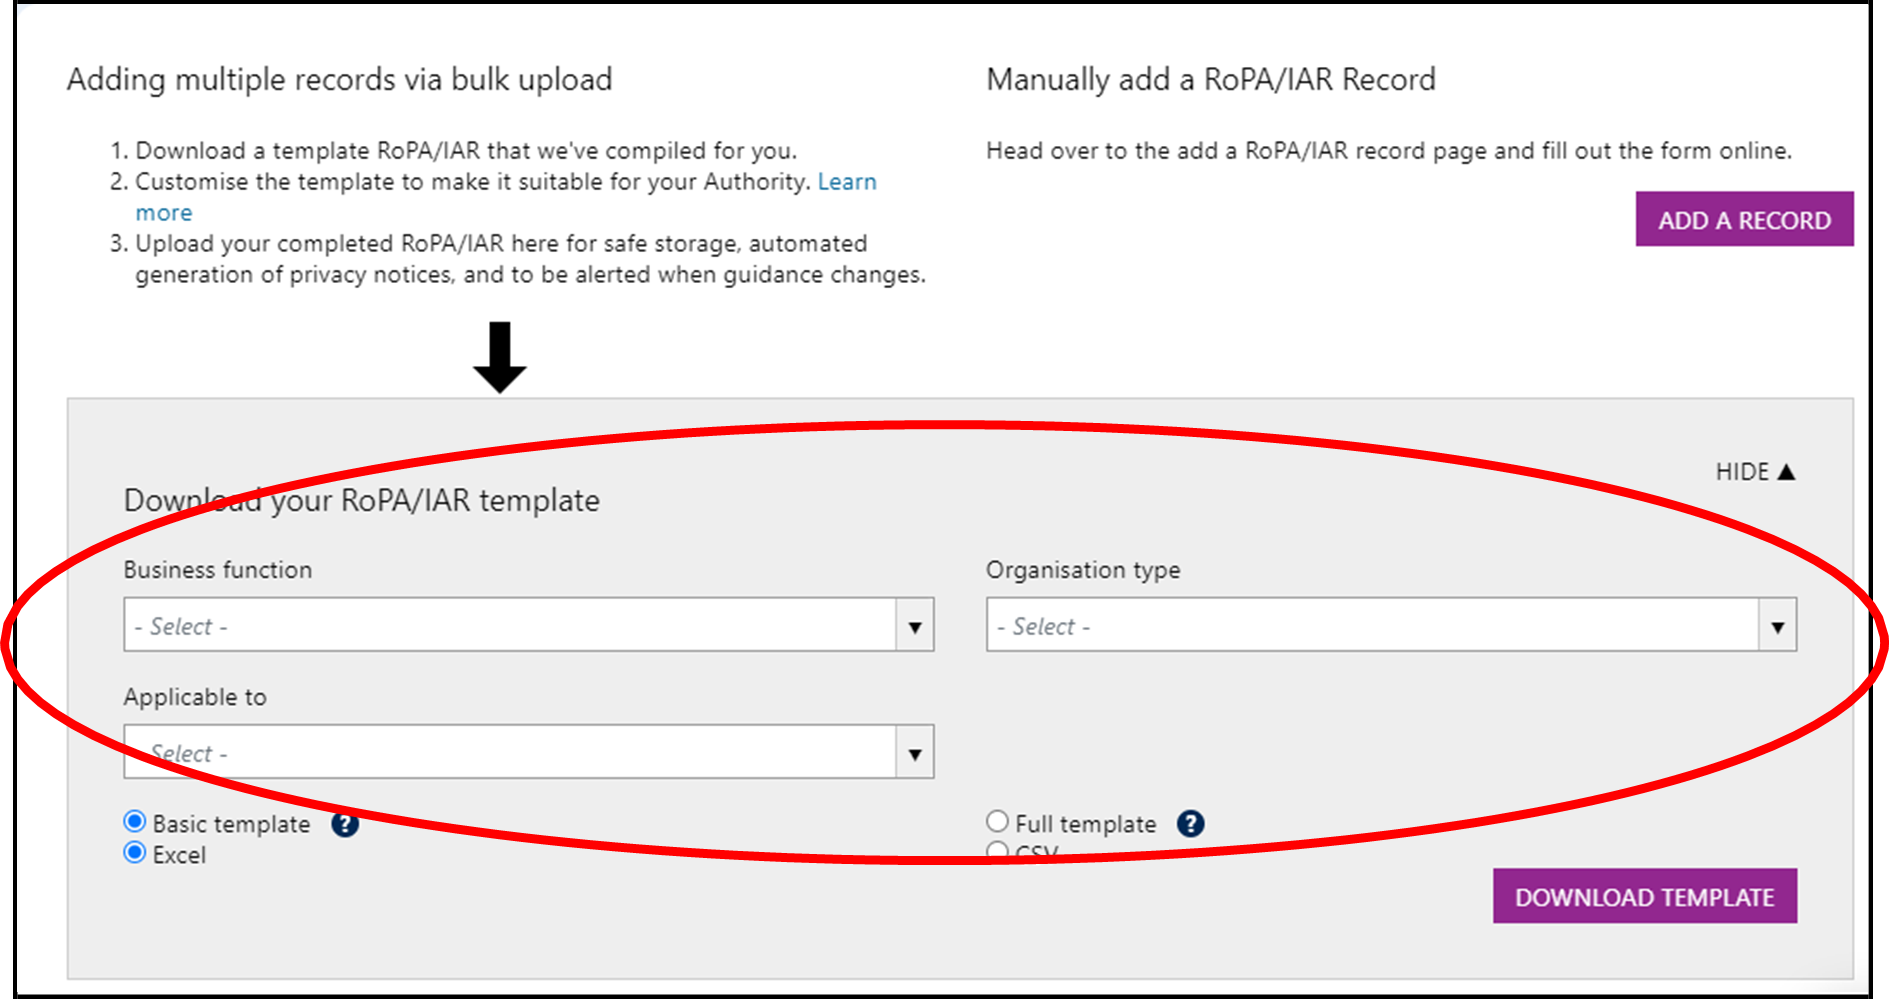
- Business function – choose one or more business functions whose records are to be included in your RoPA and/or IAR. If you don’t choose any business function the template includes record types for all business functions
- Organisation type – choose your own organisation type to restrict the template to record types you are most likely to keep.
- Applicable to – choose ‘Personal’ to select only record types which contain personal data and ‘Special’ to select only record types which contain special or sensitive personal data. To include record types which contain any type of personal data you need to select both ‘Personal’ and ‘Special’.
Especially if you are creating your IAR you may also be interested in record types which would not typically contain any personal data. To include these you need to choose the ‘Other/None’ option.
You can also include all record types by leaving all options unselected.
The format of the template can also be selected:

- Template format – choose the format you would like your template to be. It can be either:
- a csv file (comma separated text file) with one row per record type. This can typically be read by any spreadsheet application.
- an EXCEL file – Microsoft Excel spreadsheet The template can either be:
- a basic template containing fewer columns which can be used to create your RoPA and/or IAR and organise the records into your organisational structure but not to complete the full details
- a full template with more columns which can be used both to organise the records into your organisational structure and to complete the full RoPA and/or IAR details for each record type.
Once you have chosen any filters and the format of the template you require then click on the ‘Download template’ button to generate your template file.
If you have only chosen to use LG Inform Plus for either your RoPA or your IAR, after a few moments, a file named either "RoPA.csv" (or RoPA.xlsx) or IAR.csv (or Excel) will be downloaded to your computer. If you are using the tool for both then a file named ‘Combined.csv’ or (Excel) will be downloaded.
If you are maintaining your own RoPA and/or IAR offline and you have downloaded the detail template, you can use this file to input to your RoPA and/or IAR details. If you are using LG Inform Plus to maintain your RoPA and/or IAR, progress to the next section of this guide.
Back to top
6) Edit RoPA and/or IAR offline and upload changes
6.1) Edit the CSV or EXCEL file using a spreadsheet tool
Open the CSV (or XLSX) file that you have downloaded from the "Download template" option described above or from a subsequent download of your own RoPA and/or IAR. You can use Microsoft Excel, Google Sheets or any other spreadsheet package that lets you open a CSV or XLSX file, edit it and save it back in CSV or XLSX format.
The combined CSV/XLSX spreadsheet has columns A to AW as listed here:
| Column | Column heading | Notes | |
|---|---|---|---|
| A | Data Controller Name | Columns that apply to your whole organisation. You need only fill in the first row | |
| B | Data Controller Email | ||
| C | Data Controller Address | ||
| D | Data Controller Telephone | ||
| E | Data Protection Officer Name | ||
| F | Data Protection Officer Email | ||
| G | Data Protection Officer Address | ||
| H | Data Protection Officer Telephone | ||
| I | ID | Identifier that is assigned automatically to a new entry and used to identify an existing entry that you are editing or deleting. Invalid identifiers are ignored. | |
| J | Retention ID | Records retention record type identifier, which indicates where data for the pre- populated fields comes from | |
| K | Business Function | Pre-populated business function name that you can change if you have a strong preference for using your own function names | |
| L | Service ID (download only) | Columns that are pre-populated according to the record type and cannot be changed | |
| M | Service Name (download only) | ||
| N | Service Legislation Name (download only) | ||
| O | Service Legislation Power Or Duty (download only) | ||
| P | Records Description | Pre-populated according to the record type but can be changed to use your own description of the records. Often useful if you have the same record type in different business areas. | |
| Q | Contains Personal Information? | Pre-populated according to the record type but can be changed | |
| R | Contains Special Information? | Pre-populated according to the record type but can be changed | |
| S | Impact Level (download only) | Pre-populated according to the record type but can be changed | |
| T | Legal Or Business Requirement? (download only) | Columns that are pre-populated according to the record type but can be changed if your records do not match the default | |
| U | Retention Legislation Name (download only) | ||
| V | Retention Legislation URL (download only) | ||
| W | Retain Permanently? (download only) | ||
| X | Retention Requirements | Retention requirements pre-populated from the guidance. You can change this locally if you wish | |
| Y | Notes (download only) | Columns that are pre-populated according to the record type and cannot be changed | |
| Z | Data Processing Name | Columns that describe your own RoPA records. These should be filled in by you in the spreadsheet and/or online. | |
| AA | Data Processing Email | ||
| AB | Data Processing Address | ||
| AC | Data Processing Telephone | ||
| AD | Processing Purpose | ||
| AE | Joint Processor Name | ||
| AF | Categories Of Individual | ||
| AG | Categories Of Personal Information | ||
| AH | Categories Of Recipients | ||
| AI | Contract Link | ||
| AJ | Details Of Transfer | ||
| AK | Safeguards | ||
| AL | Security Measures | ||
| AM | Legal Basis For Processing | ||
| AO | Asset Owner name | Columns that describe your own IAR records. These should be filled in by you in the spreadsheet and/or online. | |
| AP | Asset owner email | ||
| AQ | Asset owner address | ||
| AR | Asset owner telephone | ||
| AS | Asset type | ||
| AT | Asset location | ||
| AU | Key asset | ||
| AV | Type | Denotes whether the record is in your ROPA, your IAR or Both. Will be preset to ROPA if you are only keeping your RoPA and IAR if you are only keeping your IAR, otherwise must be specified. | |
| AW | Delete | Enter "yes" here if you want to delete the RoPA record identified by the ROPAID column. All other values are ignored. | |
Note that the basic template you can use to create your own RoPA and/or IAR organisational structure contains only columns A to AB. All columns are in the full combined template. Columns in blue are for RoPA only and will be included in a RoPA download or a Combined download. Columns in orange are for IAR only and are included in an IAR download or a Combined download. All other columns will be included in any download.
For your RoPA you can populate the category fields with any text values that you wish, but these are the standard lists of values offered. Use the standard categories unless your organisation has agreed different values for good reason.
Categories of individual
- Employees
- Customers
- Members
- Patients
- Pupils
Categories of personal information
- Contact details
- Health data
- Financial information
- Employment data
- Education data
- Race
- Ethnic origin
- Politics
- Religion
- Trade Union membership
- Genetics
- Biometrics (where used for ID purposes)
- Health
- Sex life
- Sexual orientation
Categories of recipients
- Suppliers
- Credit reference agencies
- Government departments
- Court and police services
- Banks and insurance companies
If more than one category applies for a single RoPA record, put a "|" symbol between each category. For example "xxxxx|yyyyy". The "|" is known as a "pipe" symbol. It usually comes above the "\" at the bottom left of a PC keyboard.
For your IAR you can populate the asset type field with any of the following:
- - (use this for any asset type that does not fit any of the types in the list below)
- Contracts and agreements
- Data file
- Database
- System documentation
- User manuals
If there is another type of asset you feel should be in the list then let us know and we will add it.
6.2) Points to note on CSV/XLSX editing and upload
- You need only provide organisation details in columns A to H on the first row of data, that is row 2 of the spreadsheet in a RoPA or Combined download
- If you leave the ID column empty on a row, a new RoPA and/or IAR record will be added on upload
- If you want more than one record of the same record type, simply duplicate a row in the spreadsheet with the same Retention ID
- If you fill in the ID column your existing RoPA and/or IAR record with that identifier will be edited on upload
- Columns expecting a Boolean value will accept the values "yes" and "no" which are not case sensitive. An empty value is also accepted where the field is not mandatory.
6.3) Upload your RoPA and/or IAR
Scroll to the ‘Upload your completed RoPA/IAR template’ pane and open it by clicking on the downward arrow. Choose the file you want to upload by clicking on the ‘Choose file’ button.
Choose your file of edited RoPA and/or IAR records and, once the name of your chosen file is shown as in the image below, click "UPLOAD" to upload it for storage, viewing and editing online.

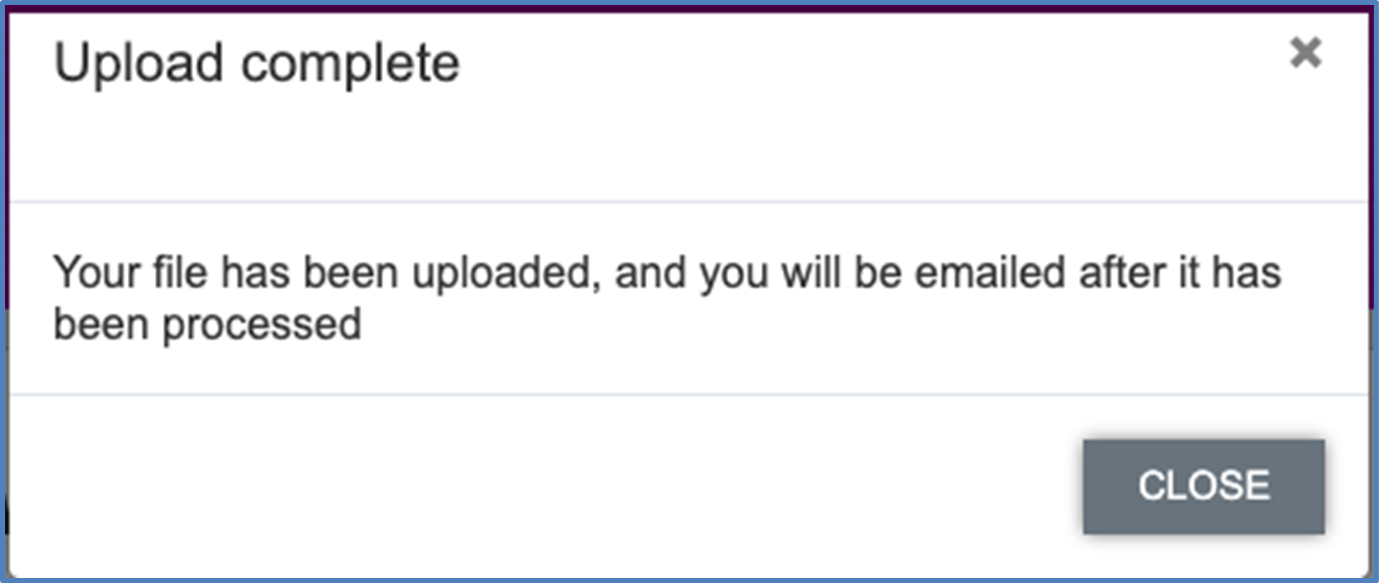
After your file has been uploaded, this message will appear:
Keep an eye on your email inbox for a message from support@esd.org.uk telling you that your upload is complete. as shown below:
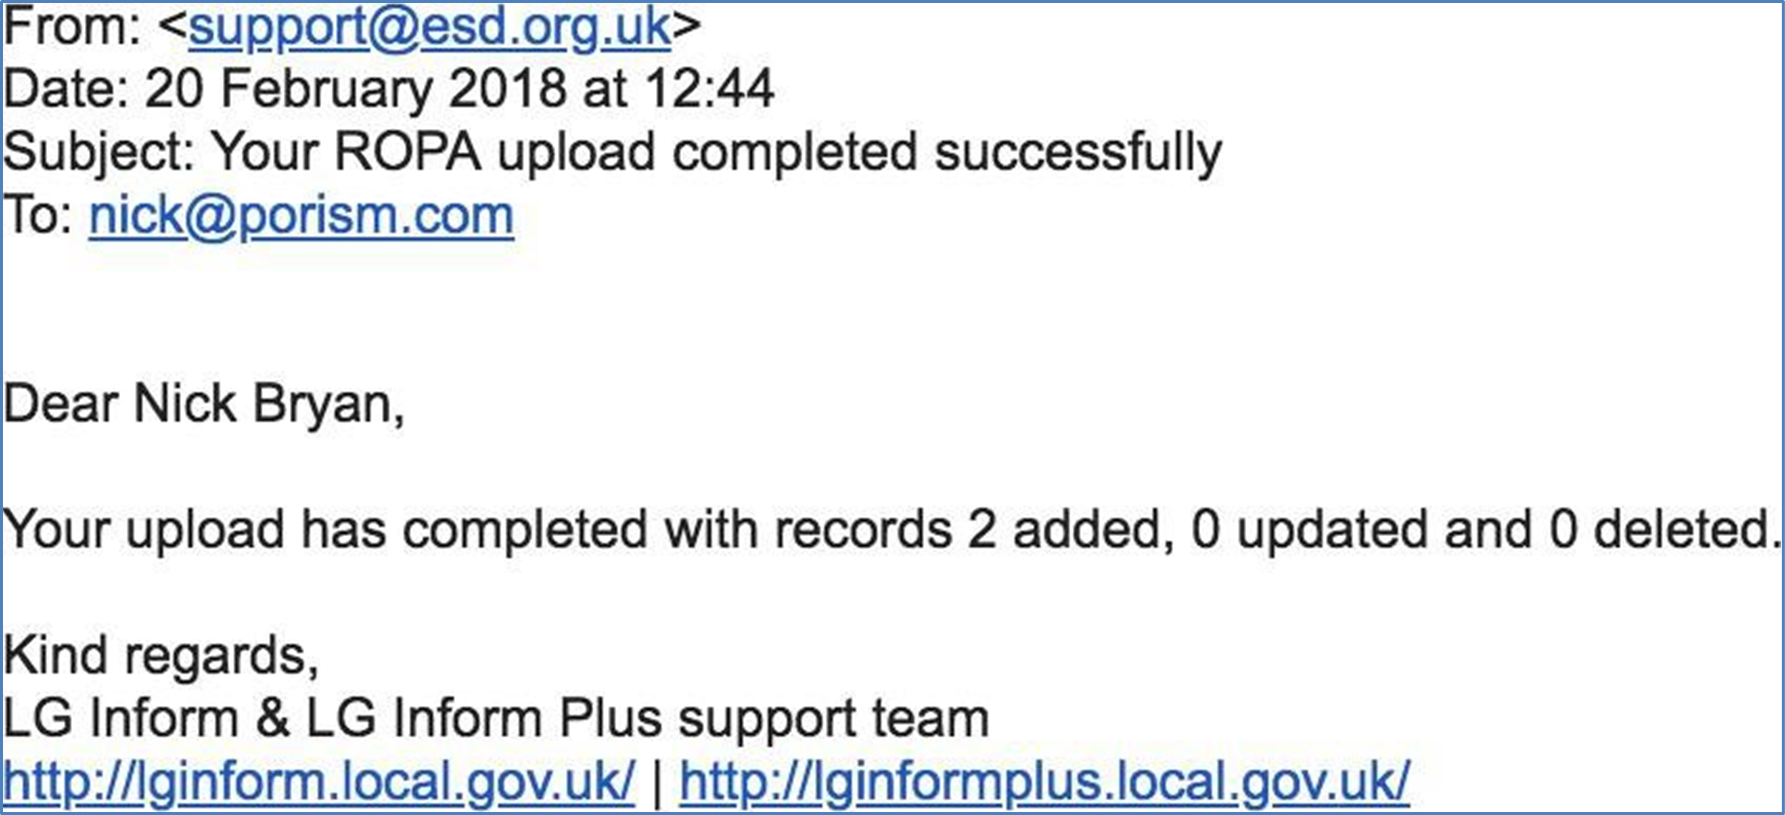
If any rows in your spreadsheet have not been processed because of errors the email message will provide details so that you can fix the errors and upload again.
Note that if your upload is part complete you will need to edit your spreadsheet so that only the rows which failed to process are included to avoid duplication.
Following successful import, you can refresh or go back to the ‘Your Register’ page which will show the records that have been imported.
Once you have added records to create your RoPA and/or IAR you will no longer see the ‘wizard’ when you choose the ‘My Register’ option but will see the records in your RoPA and/or IAR together with options to view and maintain your RoPA and IAR on an ongoing basis.
Not that if you are only using LG Inform Plus for either your RoPA or your IAR the page will only show records and options for the one you are using.
See ‘Viewing and editing your RoPA and IAR’ and ‘Privacy Notices’ later in this guide.
Back to top
7) Adding a record online
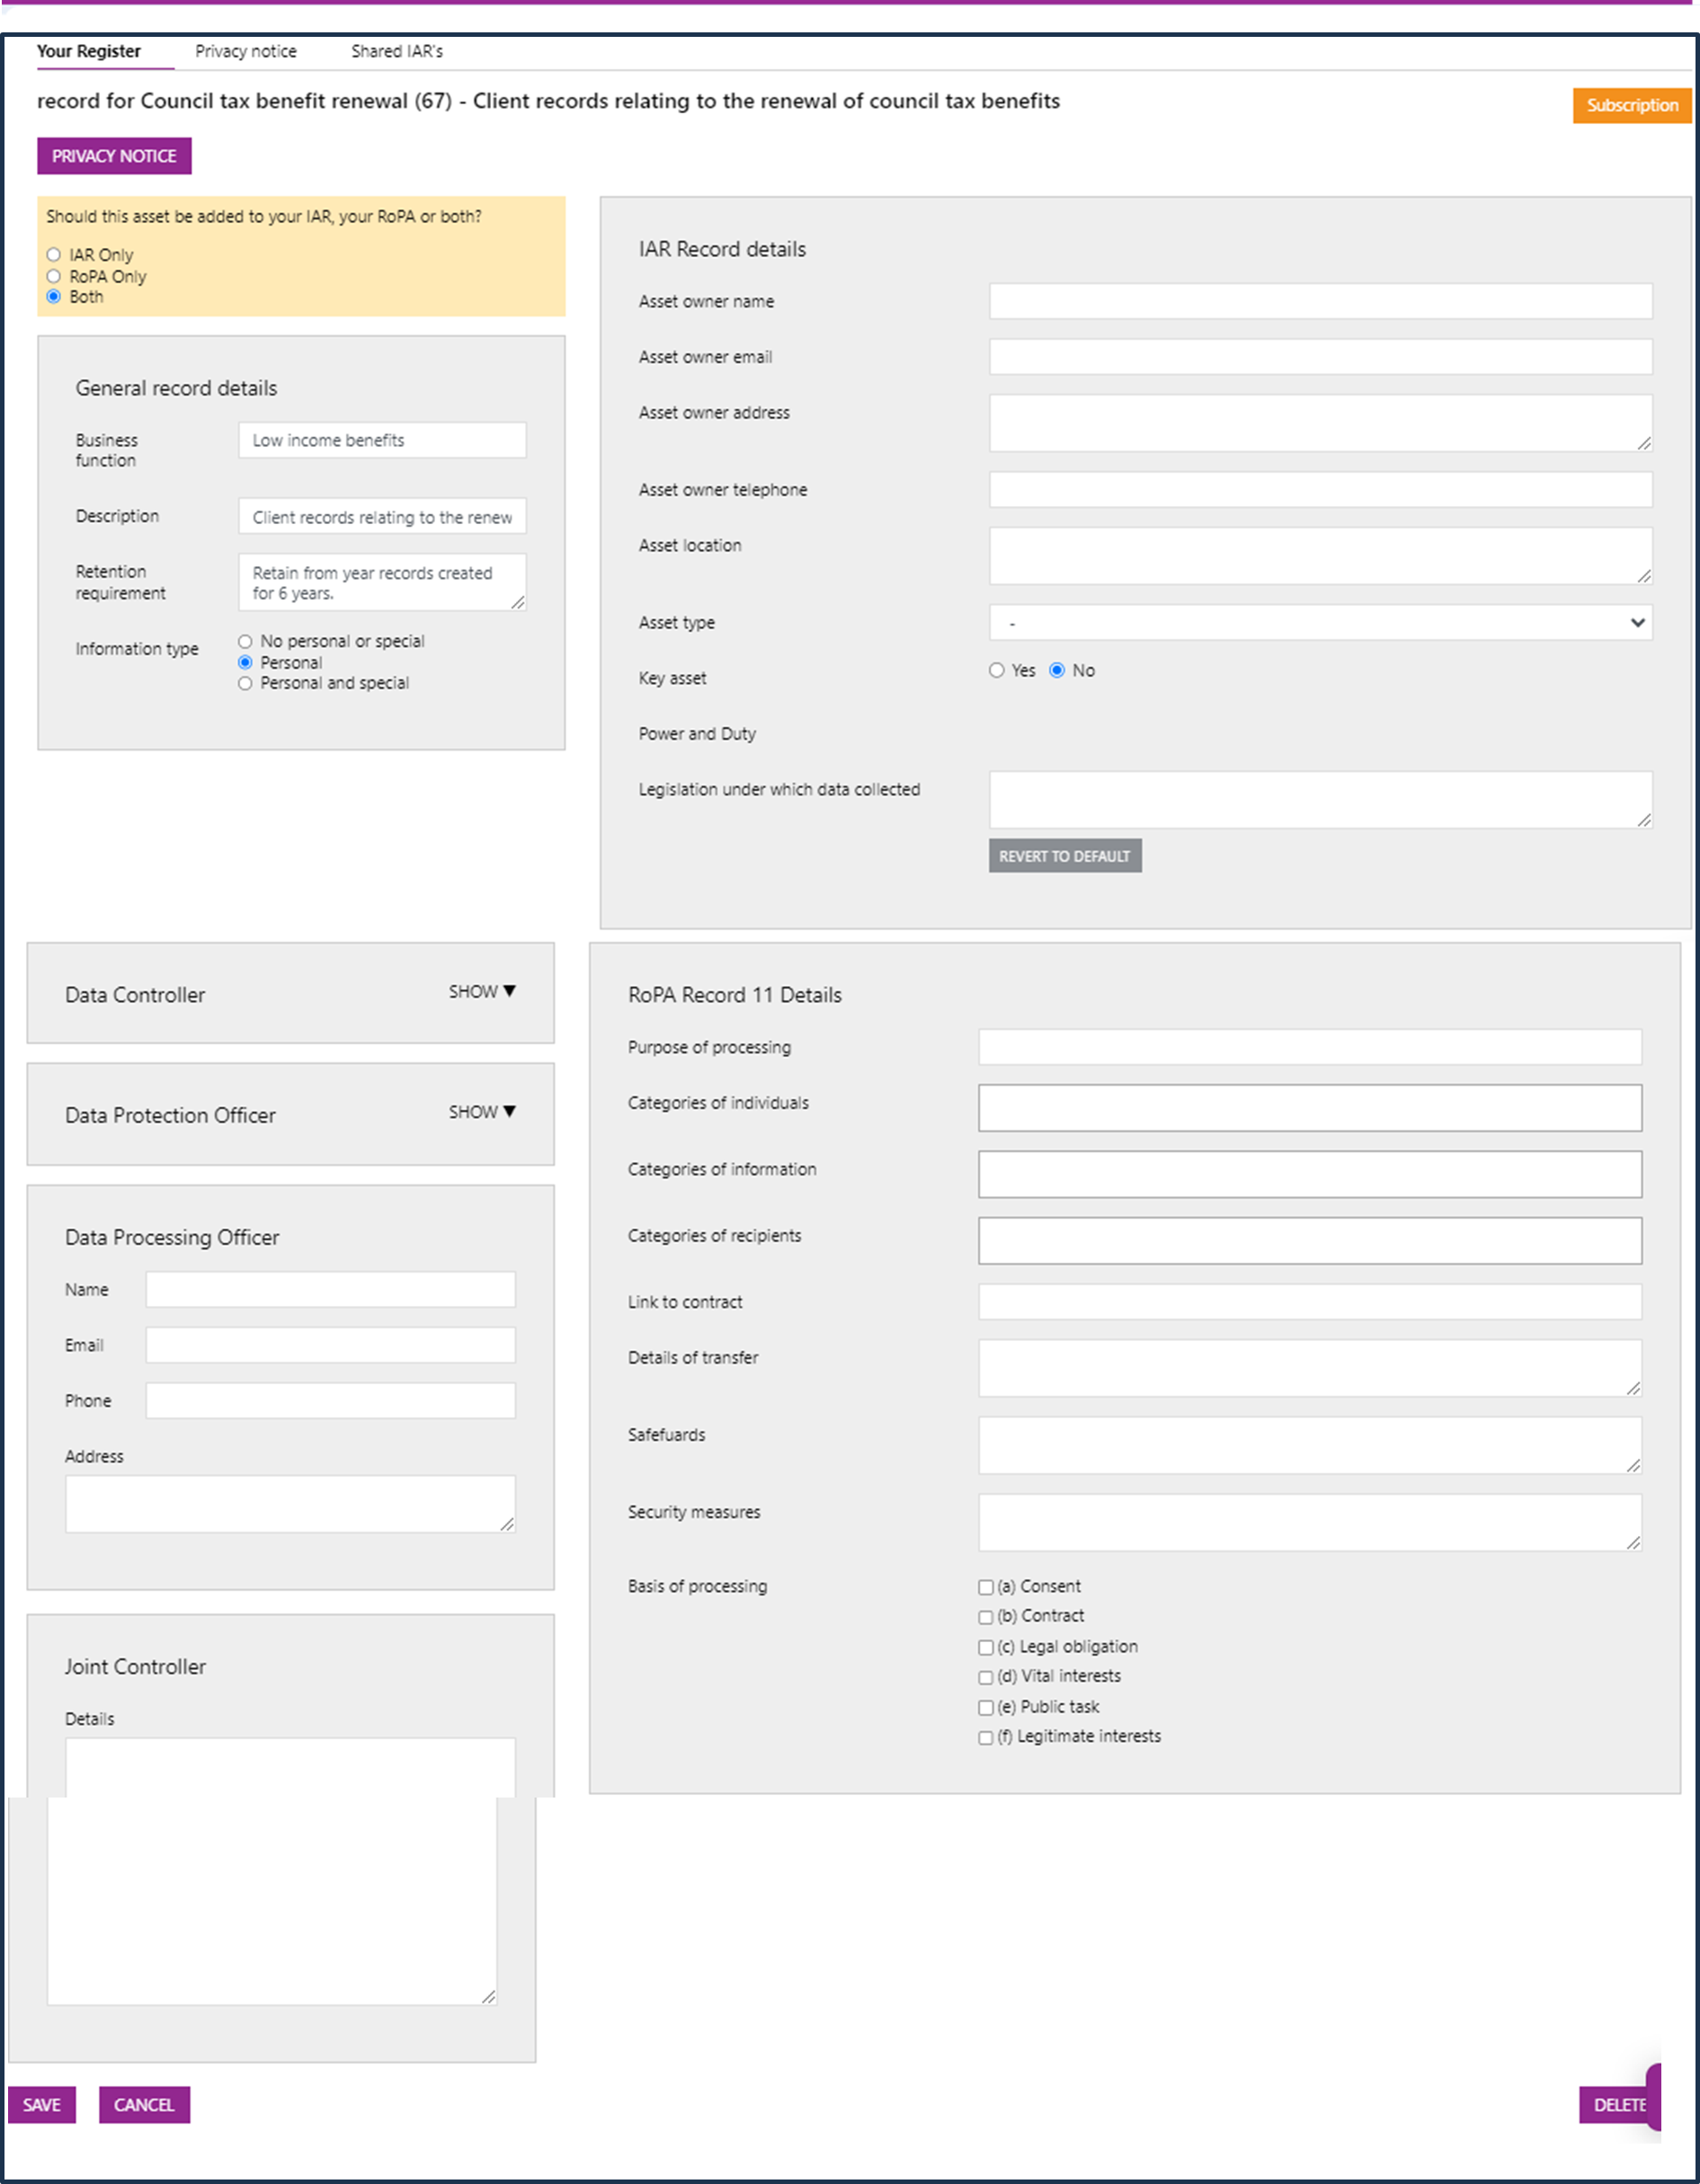
If you prefer to create your RoPA and/or IAR by adding records individually online instead of uploading from a completed template you can do this from the wizard by clicking on the ‘Add a record’ option.

A page in which you can add all the details about your new RoPA and/or IAR record is displayed.
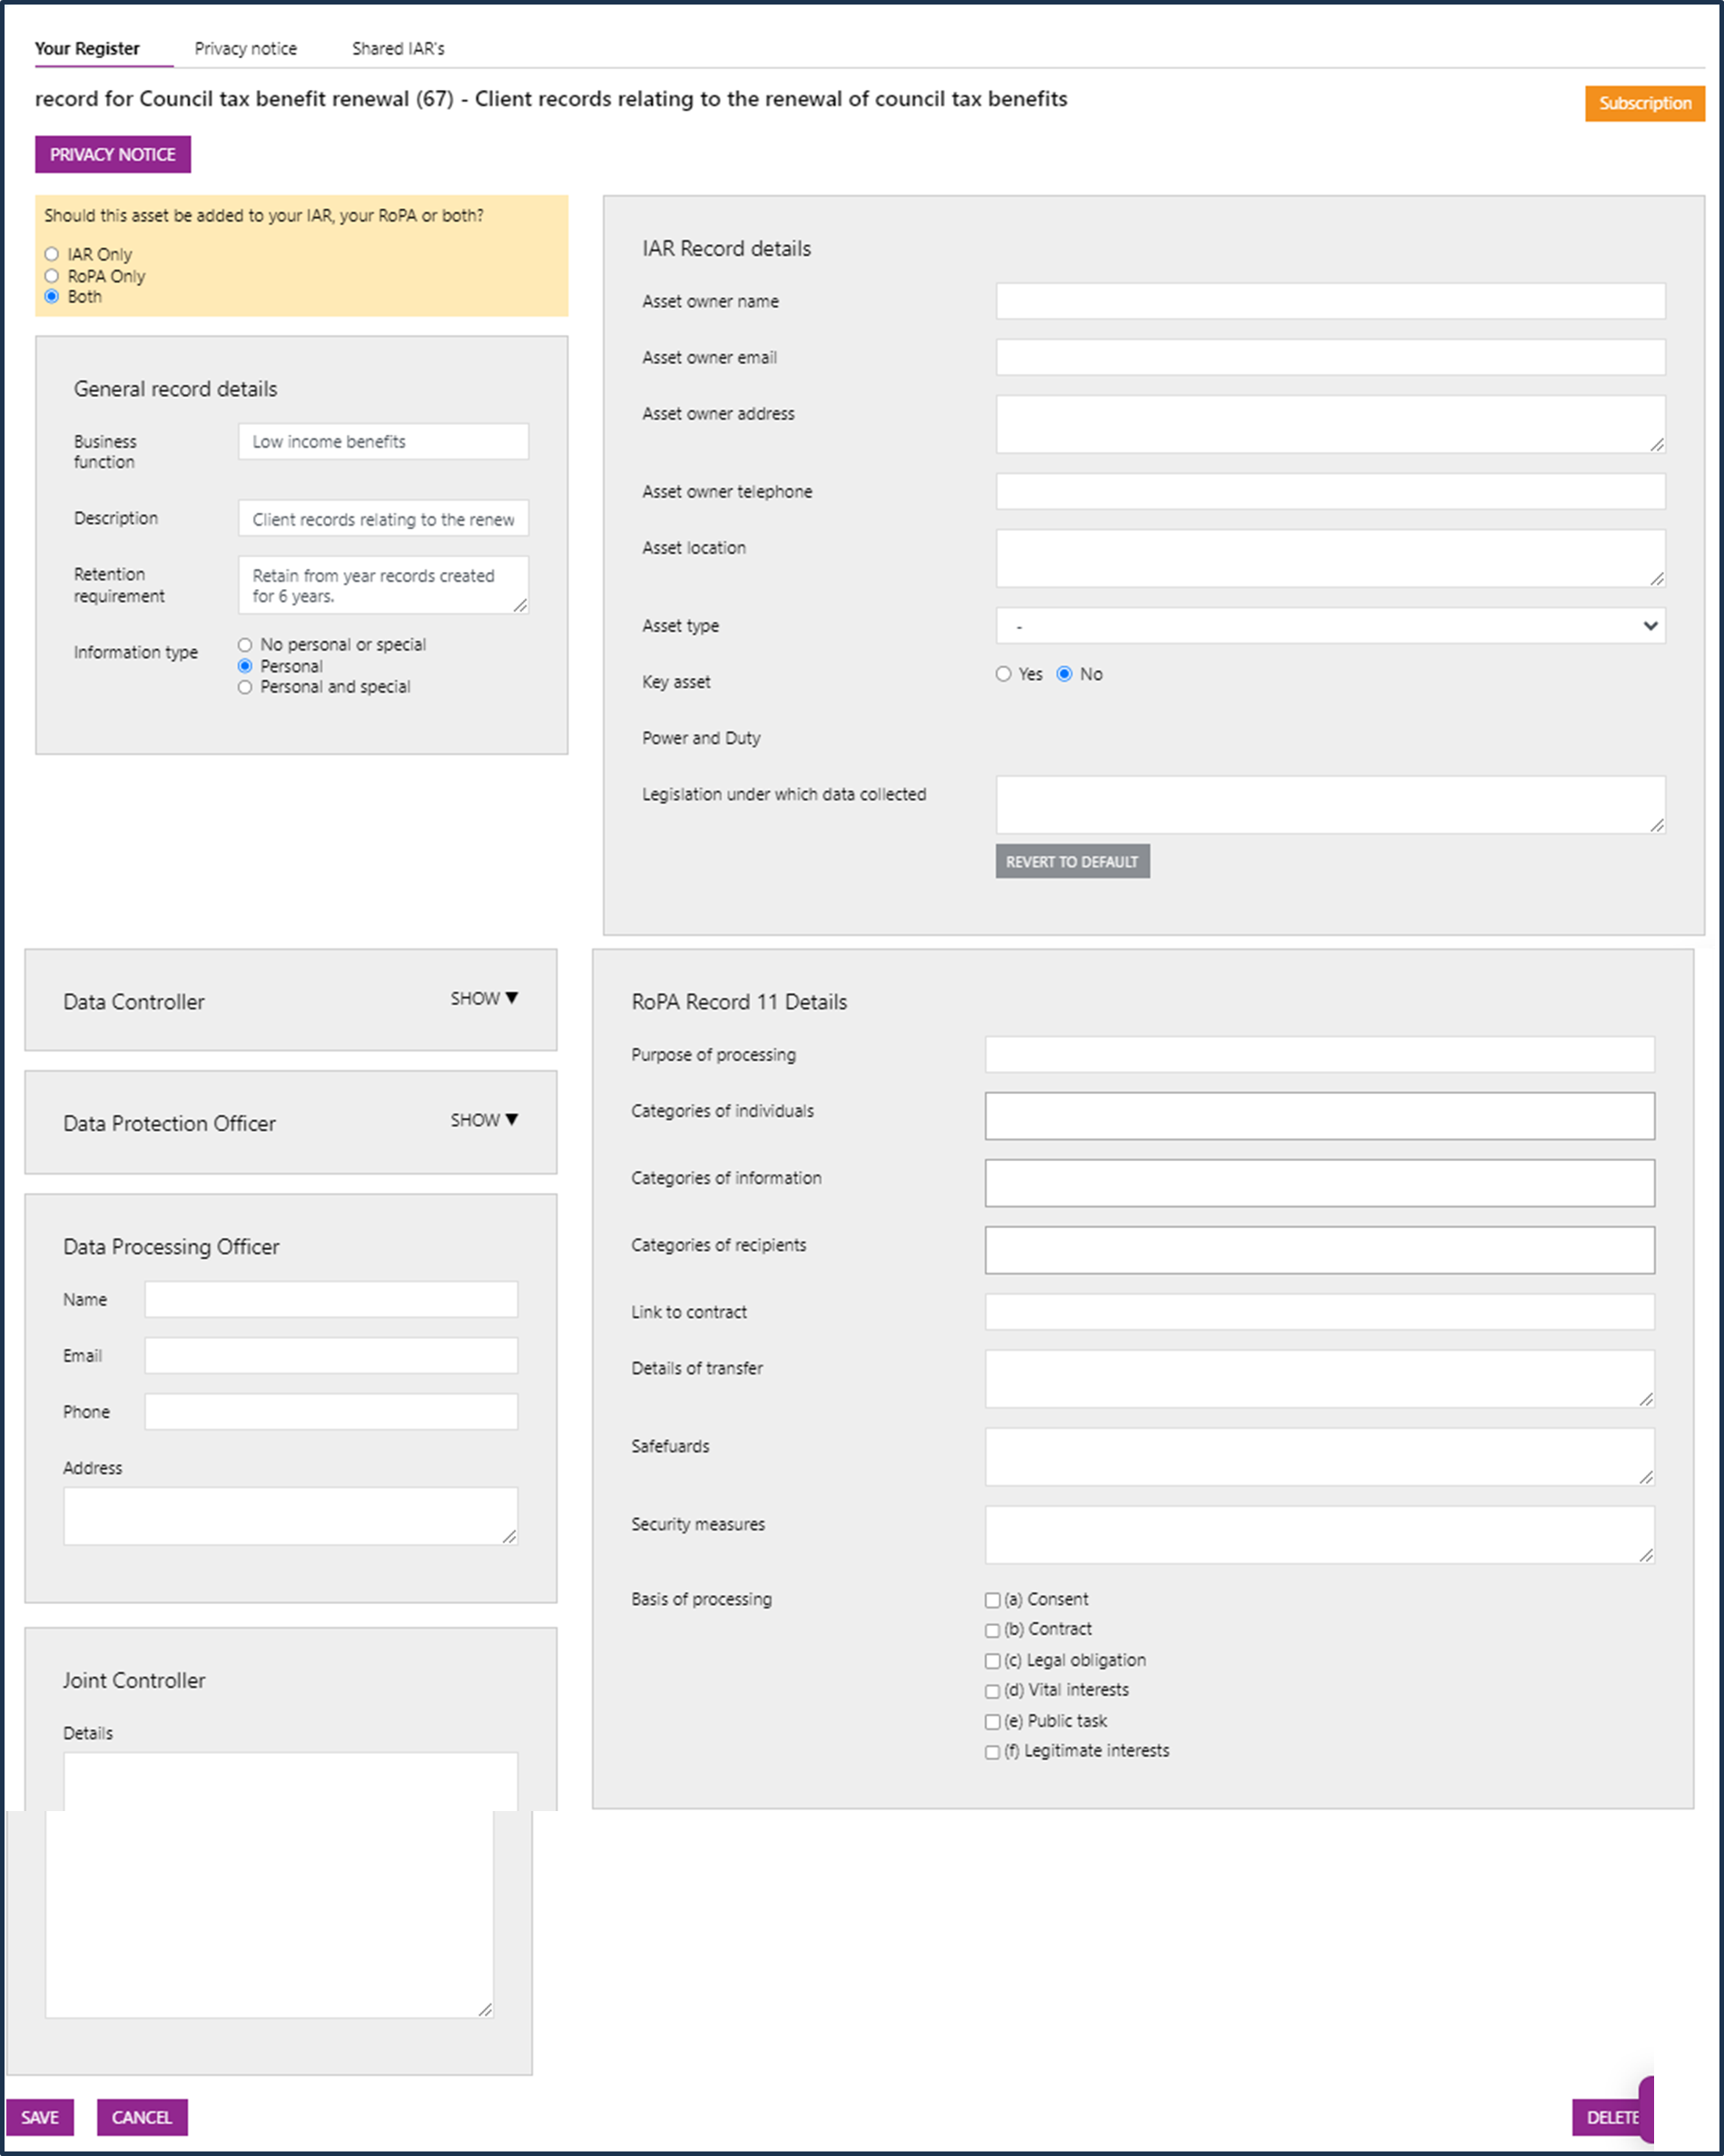
On the left hand side of the page are the ‘General record details’ which apply to both IAR and RoPA.
To enter the name, email, phone and address information for either the Data Controller or the Data Protection Officer for your organisation click on the down arrow beside the job title. Note that these are organisational roles and once entered for one record are displayed as entered against all others. If they are changed against any record they are changed against all.
When editing the "Business function" and "Retention requirements" fields you will see the reset symbol appear. Click on this once to go back to the default for the record type. Click on it again if you want to revert to the value you had typed. The control will appear when you leave one of these fields having changed from the default to your own value.
IAR record details are in a panel at the top of the right hand side of the page and RoPA record details are lower down on the right hand side of the page.
Note that there are other entries which apply to RoPA only alongside the main RoPA details panel below the ‘General record details’.
The ‘categories’ which are required information for a RoPA record can be completed by either typing in your own terms or by placing the cursor in the input box to display a list of pre-defined or previously used terms for the category. You can mix your own terms with those selected from the displayed list and can enter as many categories as you wish.
Once you have entered a term against any of the categories it will be displayed in the list of pre-defined terms for future RoPA entries.
If you are only using the tool for either IAR or RoPA the other panel will be hidden.
At the bottom of the page are save and cancel buttons . Click on these buttons to return to the ’My register’ list page after saving or abandoning your edits.
Back to top
8) Viewing and editing your IAR and/or RoPA
Once you have added one or more records to either your IAR or your RoPA, either by uploading or adding online, the wizard is no longer available.
If you choose the ‘Your Register’ option a page showing all the records you have added is displayed.
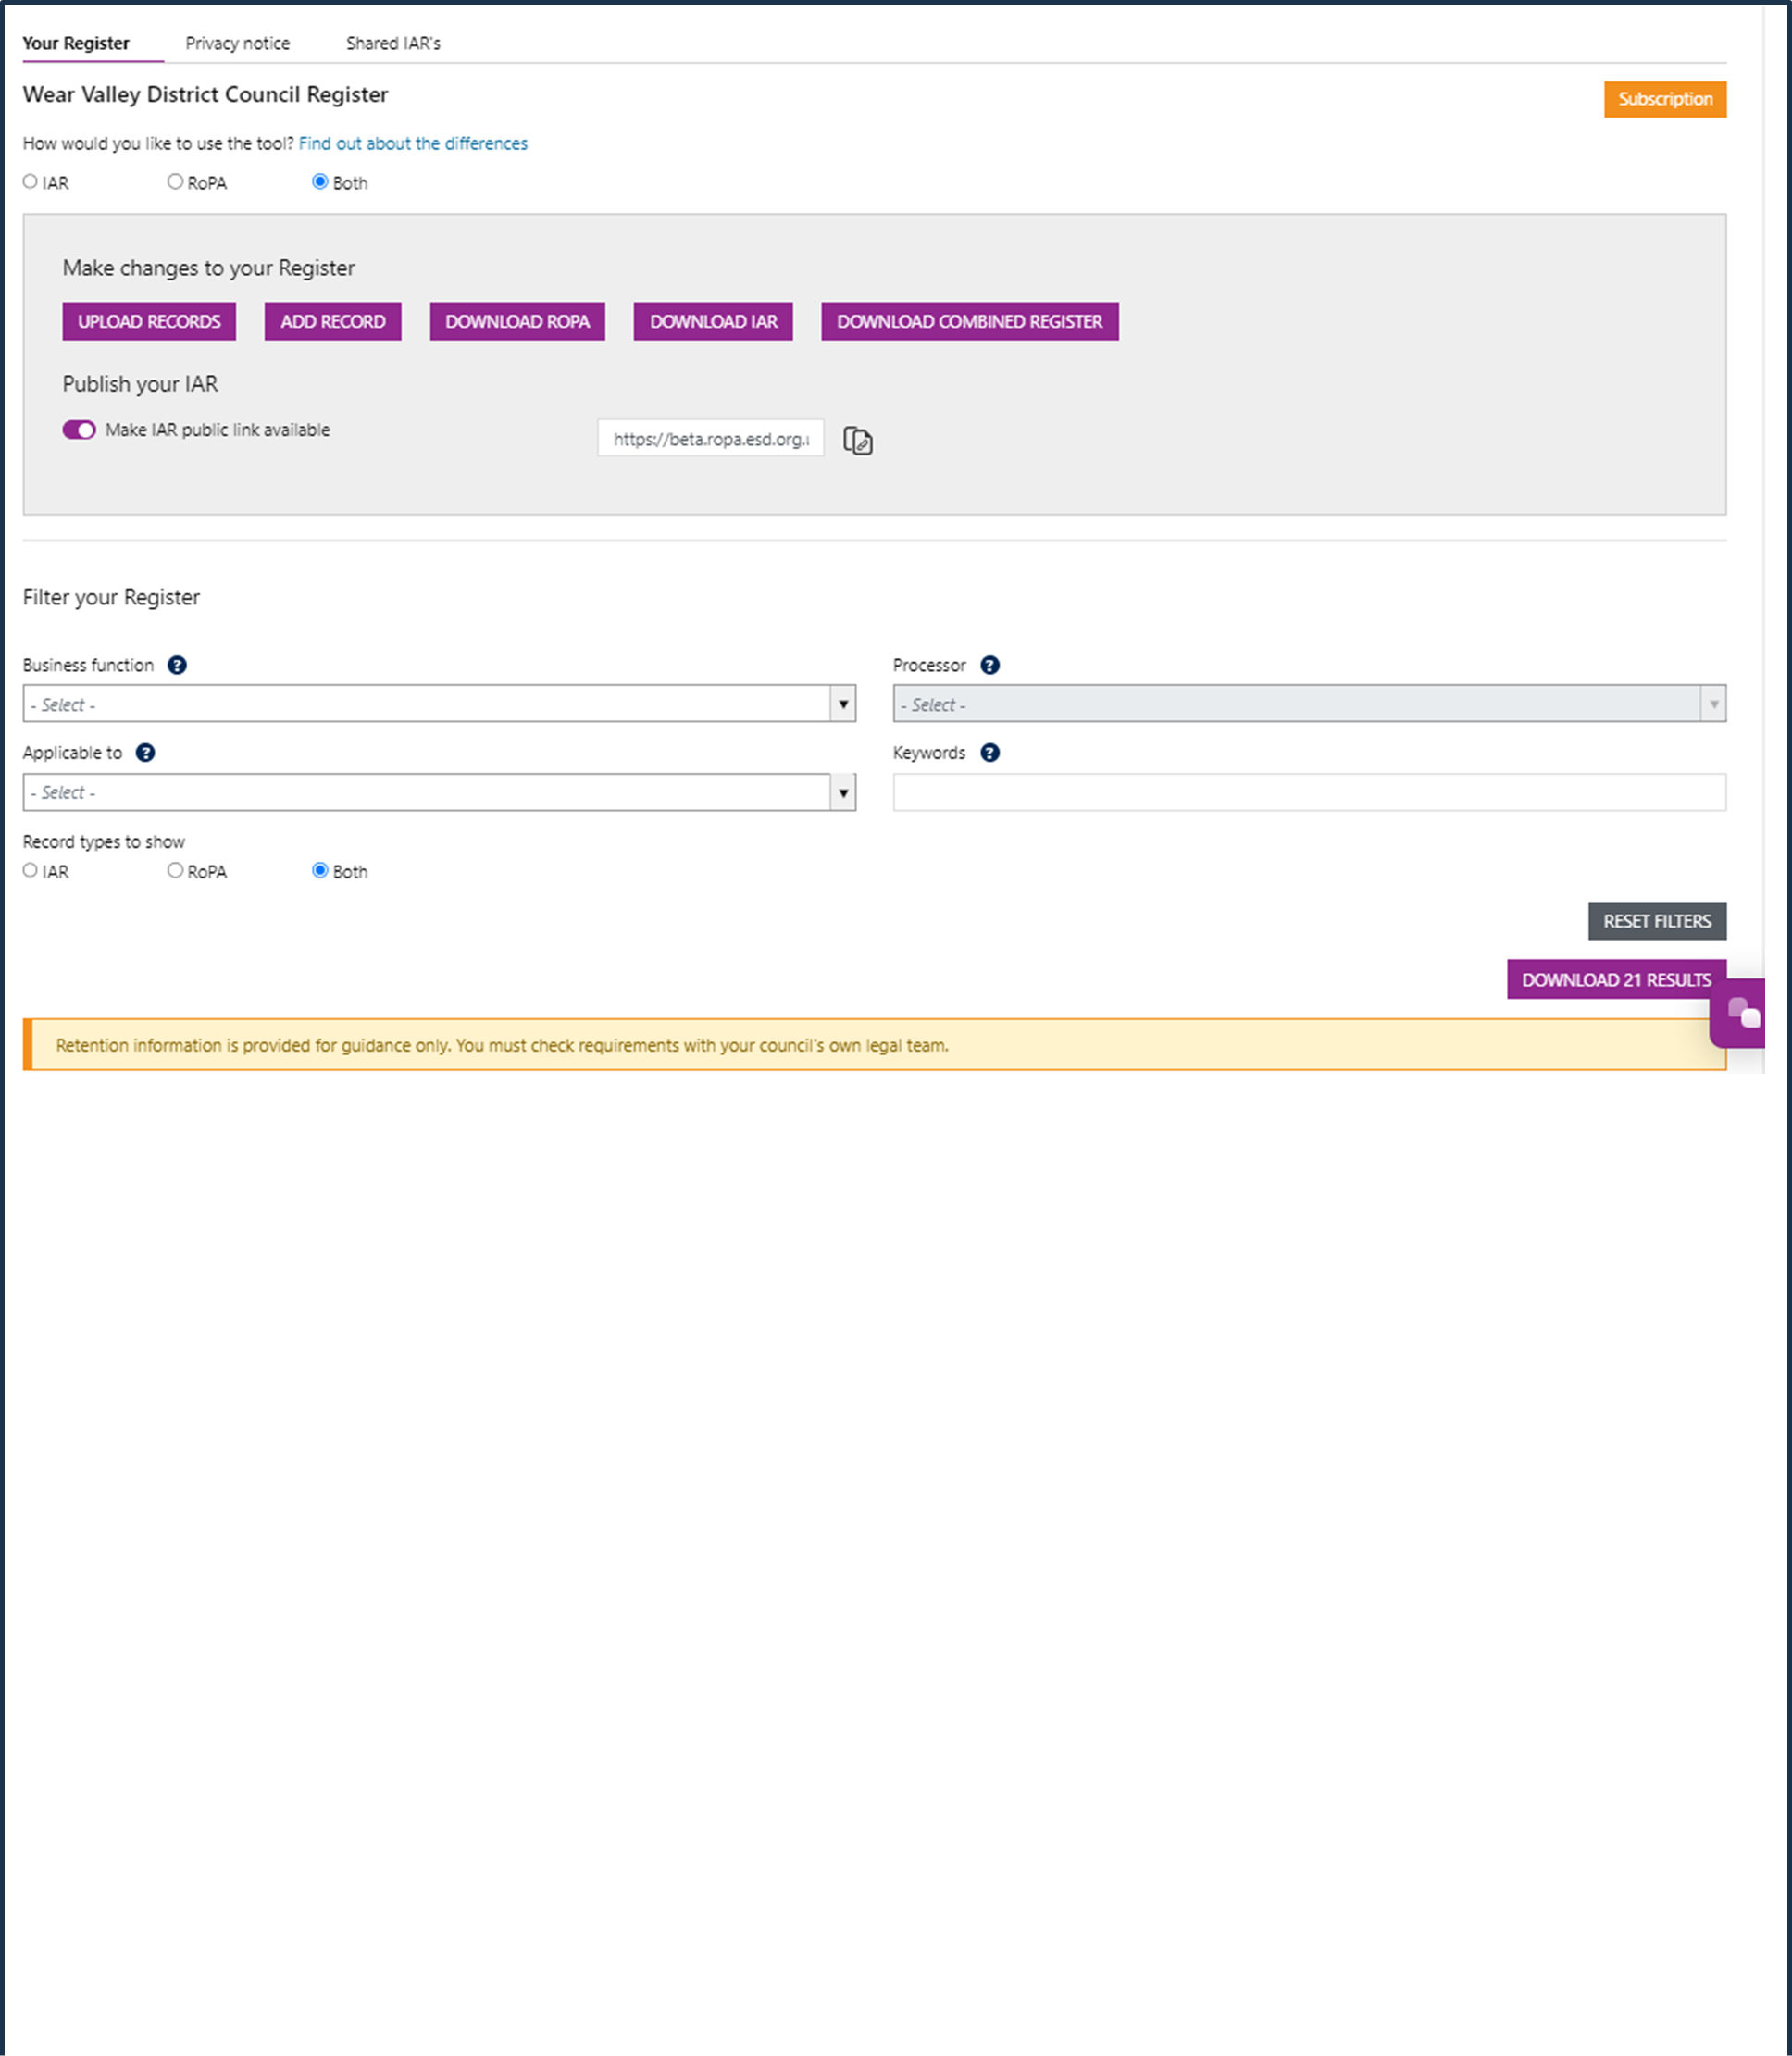
8.1) Viewing your IAR and/or RoPA
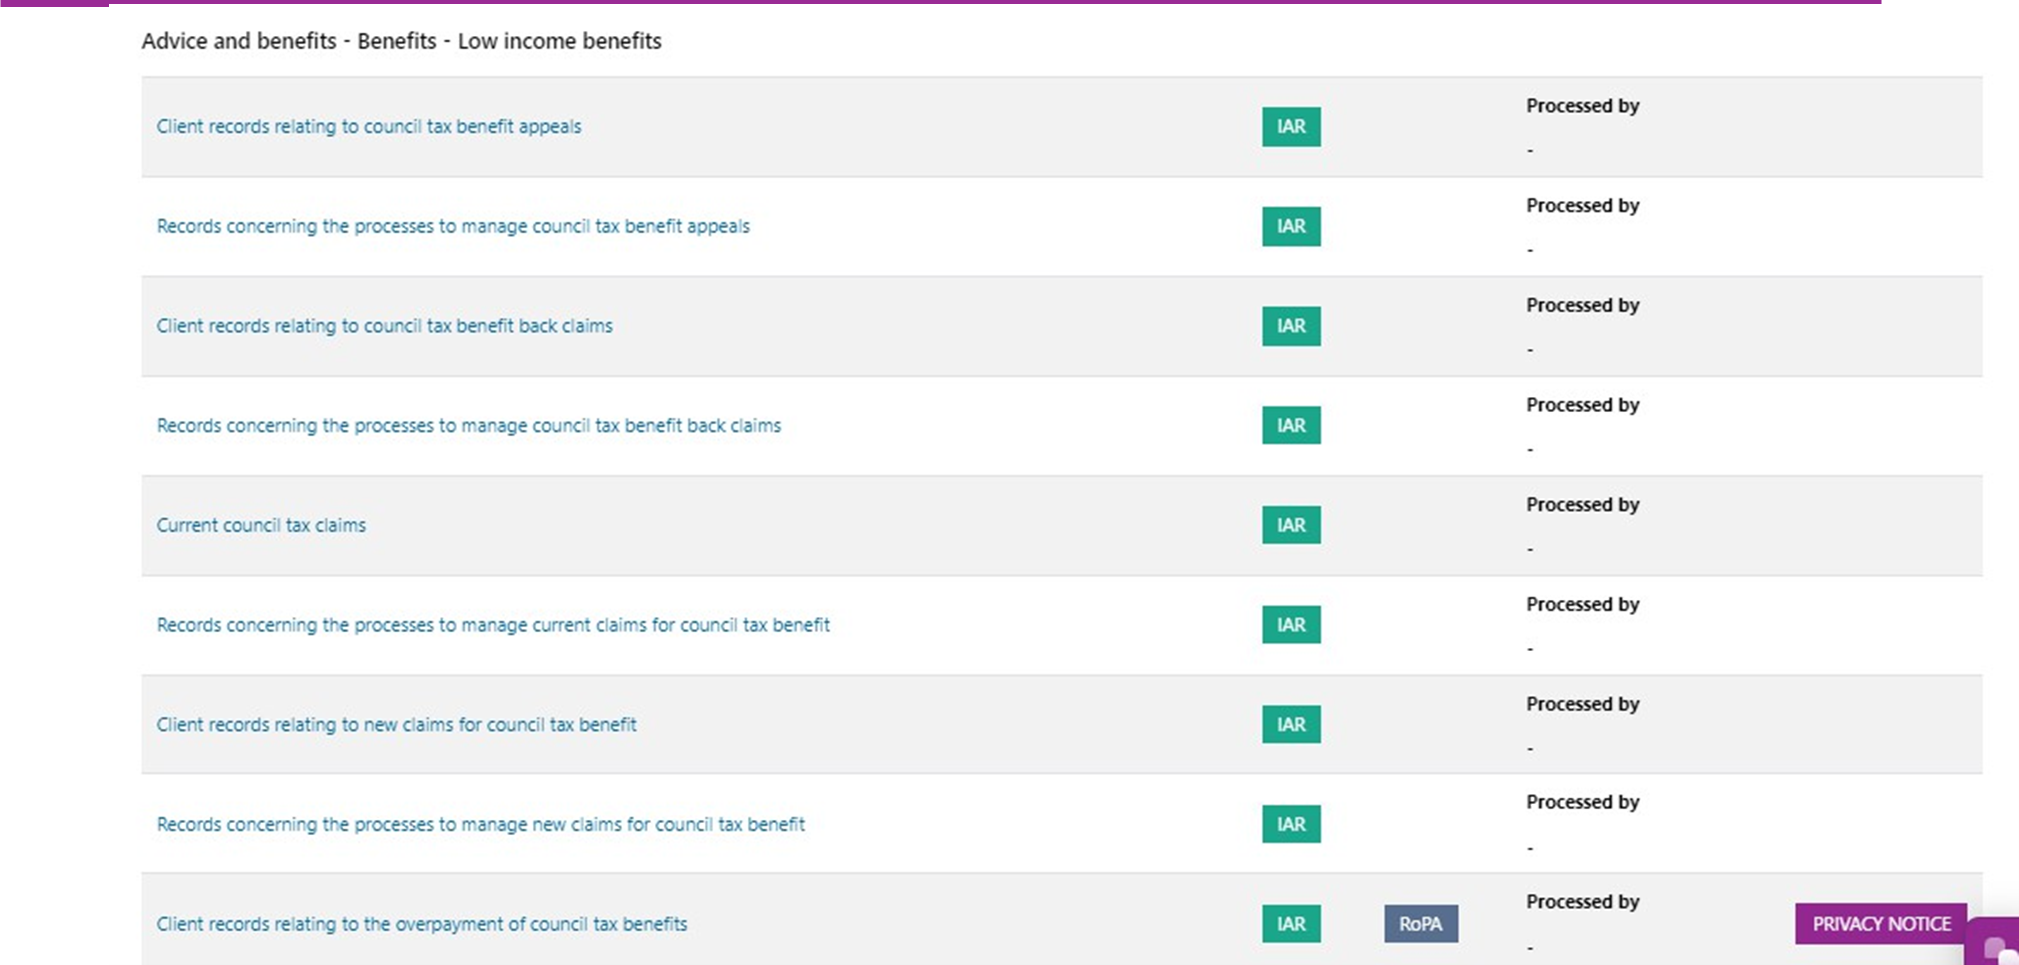
The ‘Your register’ page shows all the records which have currently been added to your IAR and/or RoPA. If you have chosen to use LG Inform Plus for both then the default view is to show all records. Records which are in your IAR are indicated by a green label and records which are in your RoPA are indicated by a blue label.
Records in your IAR and/or RoPA are sorted by business function (alphabetically) and then by the record type name within each business function.
If you scroll down the page you can see all the records which are currently in your IAR and/or RoPA.
You can see the full details of any record by clicking on the record name in the list. This displays the current information for the record.
You can filter the view to show only IAR records or only RoPA records by selecting the appropriate radio button at the bottom of the filter selections.
You can also filter the records you are viewing by:
- Business function
- Applicable to: Whether they do or do not contain personal information
- Processor: The owner of the information
- Keywords: Any keywords in the IAR or RoPA record label
You can download the records you have filtered from the ‘DOWNLOAD nn RESULTS’ button above the list of records or use the various download options at the top of the page.
8.2) Editing your IAR and/or RoPA
8.2.1) Editing an existing record
To see and edit the details of any existing record simply click on the name in the list. A page in which you can edit the details is displayed (see picture below).
Once you have clicked on the record name any details can be edited at this point by simply changing the necessary fields and then clicking on the ‘SAVE’ option.
You can also delete the entry by clicking on the ‘DELETE’ option and then confirming that you wish to delete in the lightbox displayed.
If you just wanted to view the details of a record but not make any changes then the ‘CANCEL’ option returns to the list page.
8.2.2) Editing on a spreadsheet
You can also download your IAR and/or RoPA – or both combined - in a spreadsheet format (CSV or XLSX) to make changes offline and then upload them.
From the ‘Your register’ page choose one of the download options - IAR, RoPA or Combined - to see the types of download you can do.
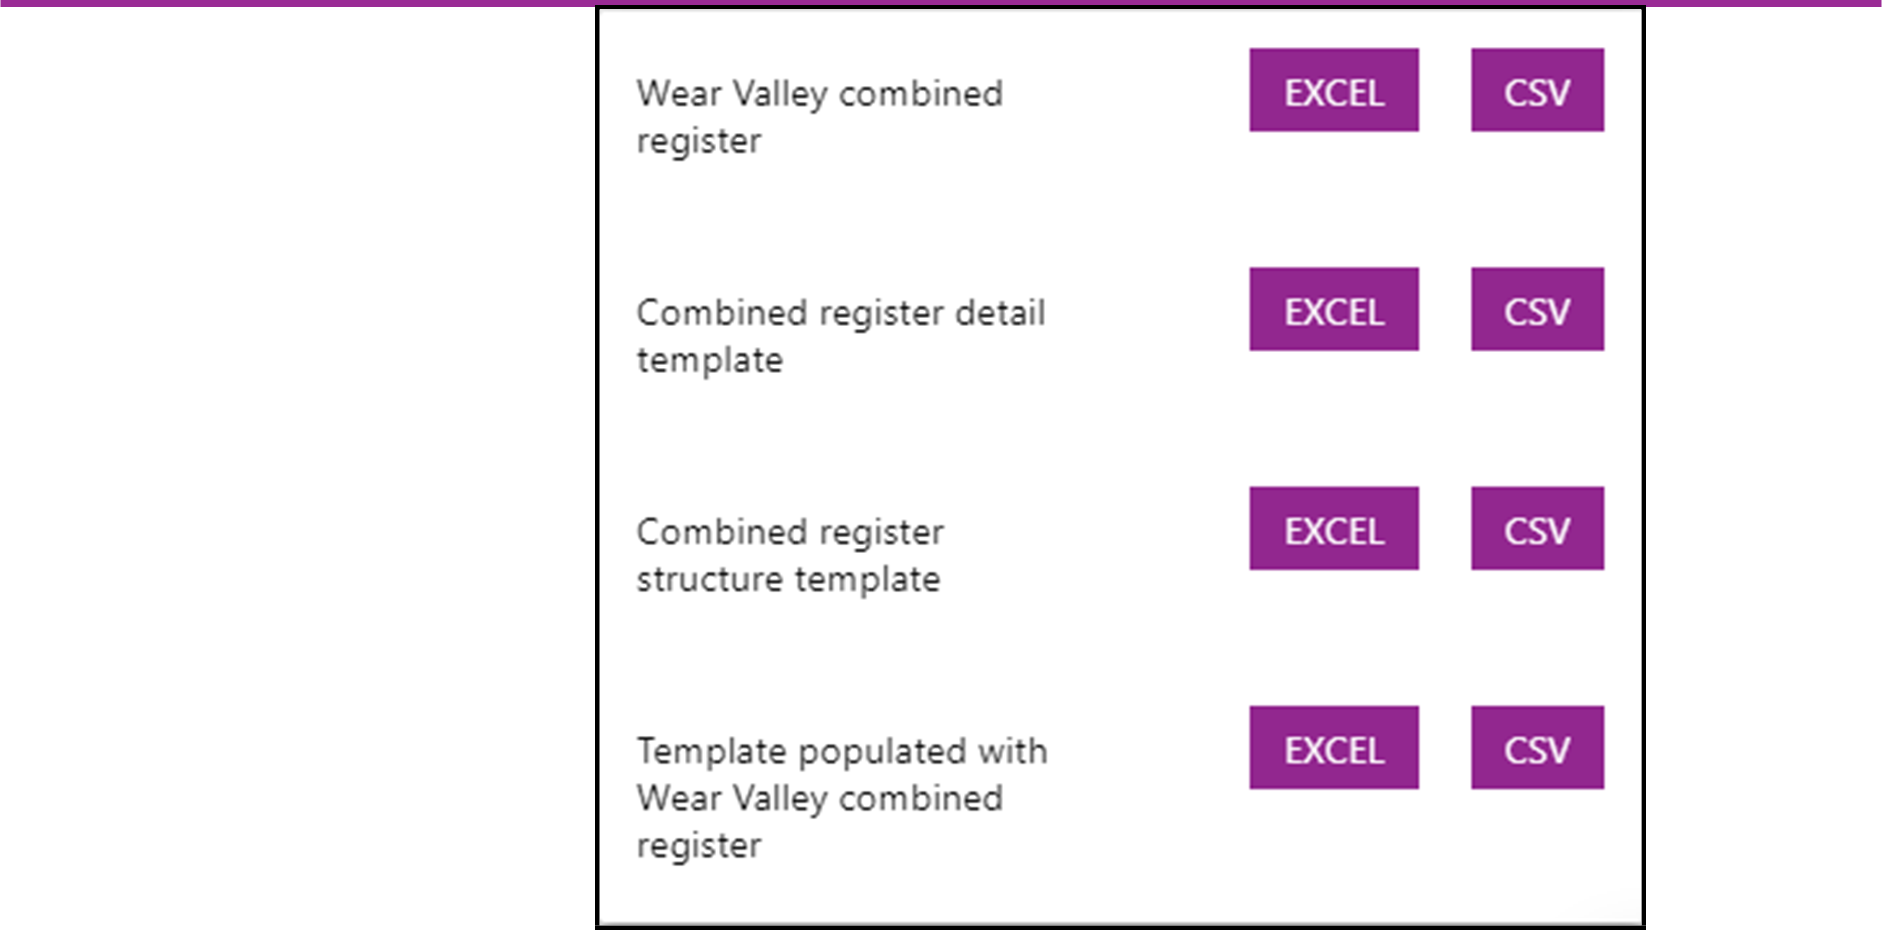
Choose from one of the following:
- Authority name IAR/RoPA/Combined register - a download of all the records in your RoPA or IAR or both together
- IAR/RoPA/Combined register detail template - a blank template with all the record types which match any filters you have selected. The template will have columns for all fields that apply depending on which IAR/RoPA/Combined template you have chosen
- IAR/RoPA/Combined register structure template - a blank template with just the general columns which allow you to assign record types to the correct business function for your authority. Columns specific to IAR and/or RoPA are not included.
- Template populated with authority name IAR/RoPA/Combined register - a detailed template which will include any record types which match the filters you have selected. Where those record types have already been completed for your IAR and/or RoPA the full details are included in the download and can be updated.
You can choose to download your file as an MS Excel file or as a text file (csv) which can be read by any spreadsheet application.
Points to note when editing your register(s) from a template:
- Do not delete or change the ID for existing records. This is used to find and update an existing record.
- If you want to delete an existing record (with an ID) enter ‘yes’ in the delete (last) column on the spreadsheet
- If you want to create more than one record of the same record type simply copy the details to a new row (blank out the ID in the new row if there is one)
- Any row in your spreadsheet which does not have an ID will be added when you upload. Make sure you delete any rows you do not need.
Once you have edited and saved your spreadsheet you can upload the results to update your IAR and/or RoPA.
Back to top
9) Sharing your IAR
To generate a public link to your IAR which you can use to share it with others and to share your IAR with other LG Inform Plus subscribers:
From the ‘Your register’ page underneath the ‘Publish your IAR’ heading switch the ‘Make IAR public link available’ option on.

A URL for a public link to your IAR is displayed together with an option to copy the link so that you can use it elsewhere. If you publish the link - on your Web site or by sending it as a link to others - then a spreadsheet version of your full IAR is downloaded for viewing.
Your IAR will also then be visible to other LG Inform Plus subscribers under the ‘Shared IAR’s’ tab at the top of the page. You will be able to see any other shared IARs on the same page.
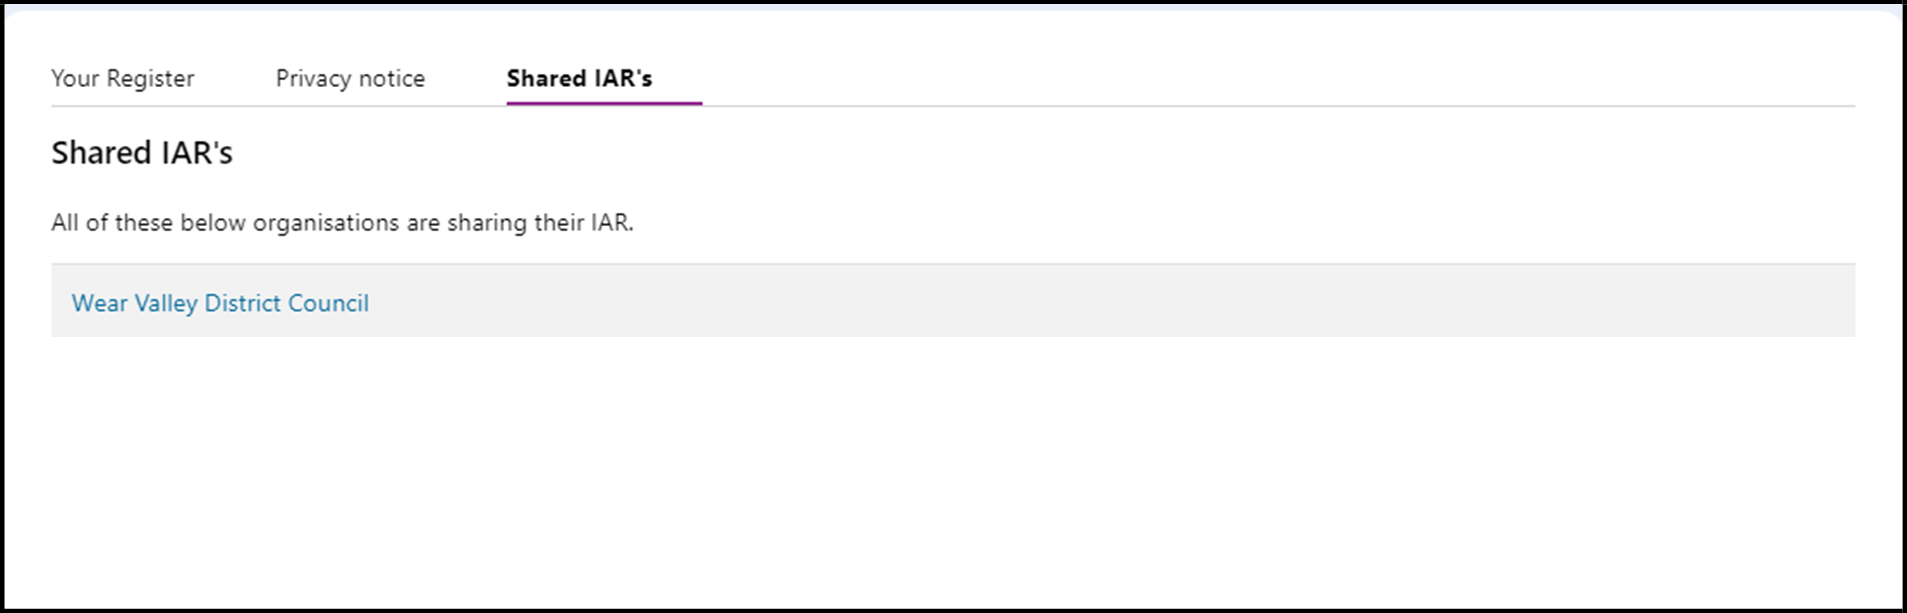
Clicking on the name of any shared IAR you would like to see will download it as a csv file which you can open in any spreadsheet application.
If you want to use the public link to your IAR but not to share it with other users then you can switch the option on to copy the link and then switch it off.
Back to top
10) Creating Privacy Notices for RoPA records
You can create and save one or more privacy notices against each of your RoPA records. A privacy notice is something you can give to those whose information you hold to explain what information you hold about them and what you are doing with that information (how you are keeping it, who you are sharing it with, how long you will keep it etc.).
Your organisation may have a standard format privacy notice already defined (or multiple ones used for different types of data).
You can set these up as ‘templates’ which can then be linked to appropriate RoPA records. Once you have linked a template to a RoPA record you can edit it to be more specific to that set of records if you wish.
10.1) Creating template privacy notices
To create a customised template privacy notice click on the ‘Privacy notice’ option in the top menu.
The page explains a little about your RoPA and privacy notices and then has a pane for templates.
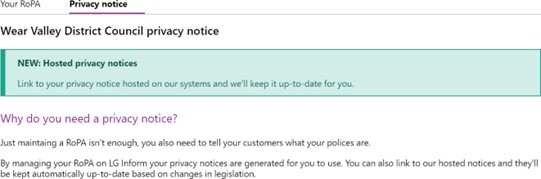
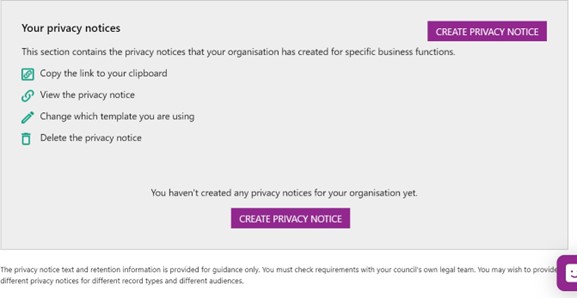
There is a default privacy notice template provided for you and you can simply use this if you wish.
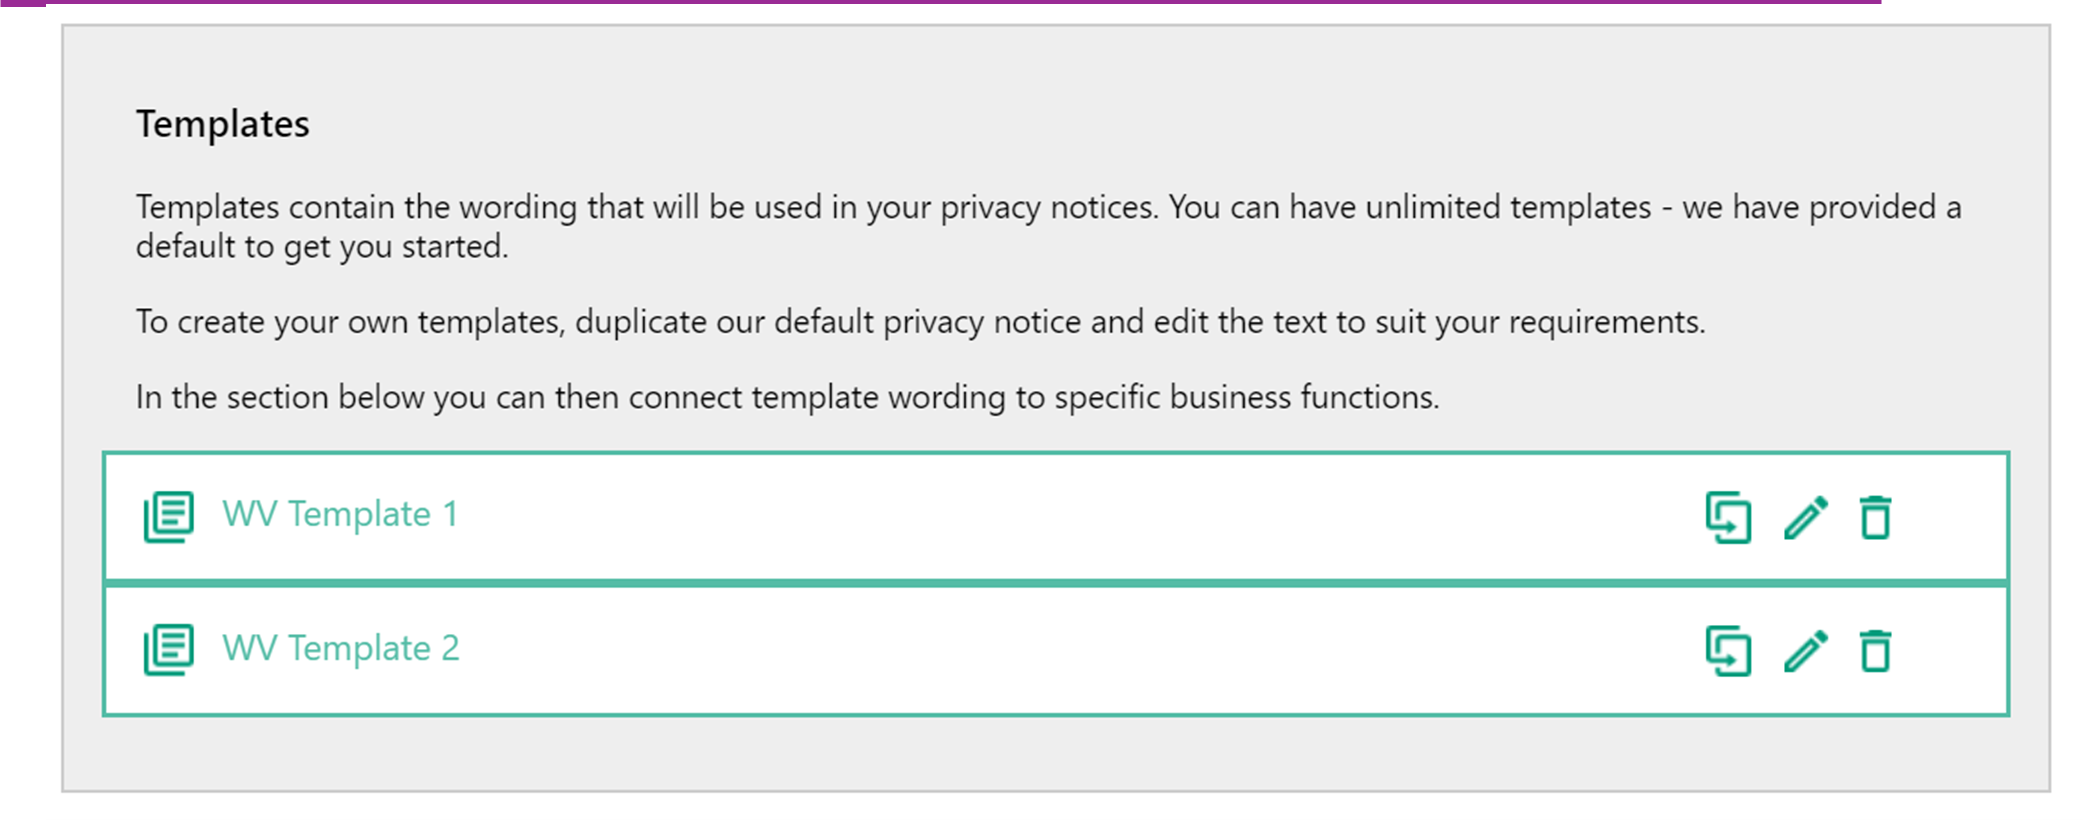
Alternatively you may wish to create your own templates, possibly for each business function or for specific record types or customers. To create a template click on the ‘duplicate privacy notice’ button to display the default template for editing.
When prompted enter a name for your template and then click on ‘DUPLICATE’ to add the new template.
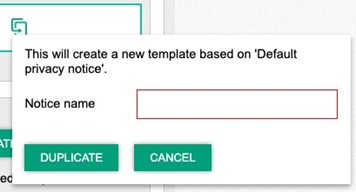
Note that once you have created your own templates you will be able to duplicate and edit from these rather than the default template if you prefer. Once created your new template is added to the list of templates.
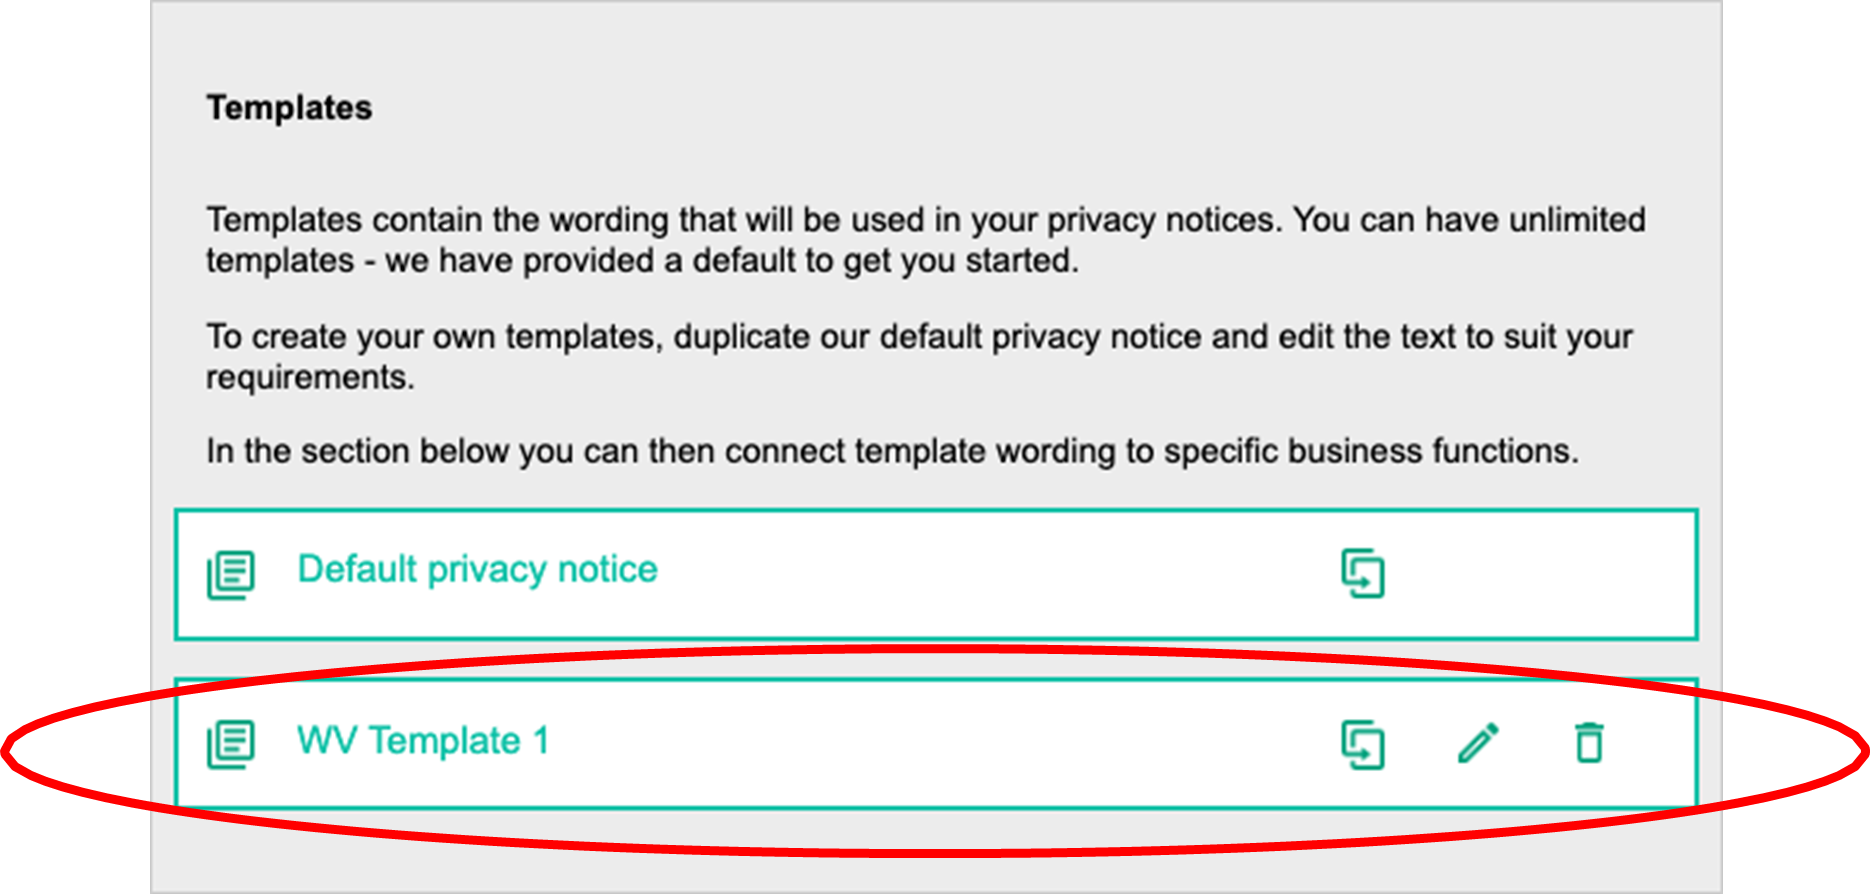
You can then edit the template as required by clicking on the edit button ( ) to display the template for editing.
Note that editing a template is an advanced feature which requires some knowledge of HTML. You may have officers in your organisation who can do this but, if not, or if oyou would like some help the support team (support@esd.org.uk) would be pleased to help if you contact them.
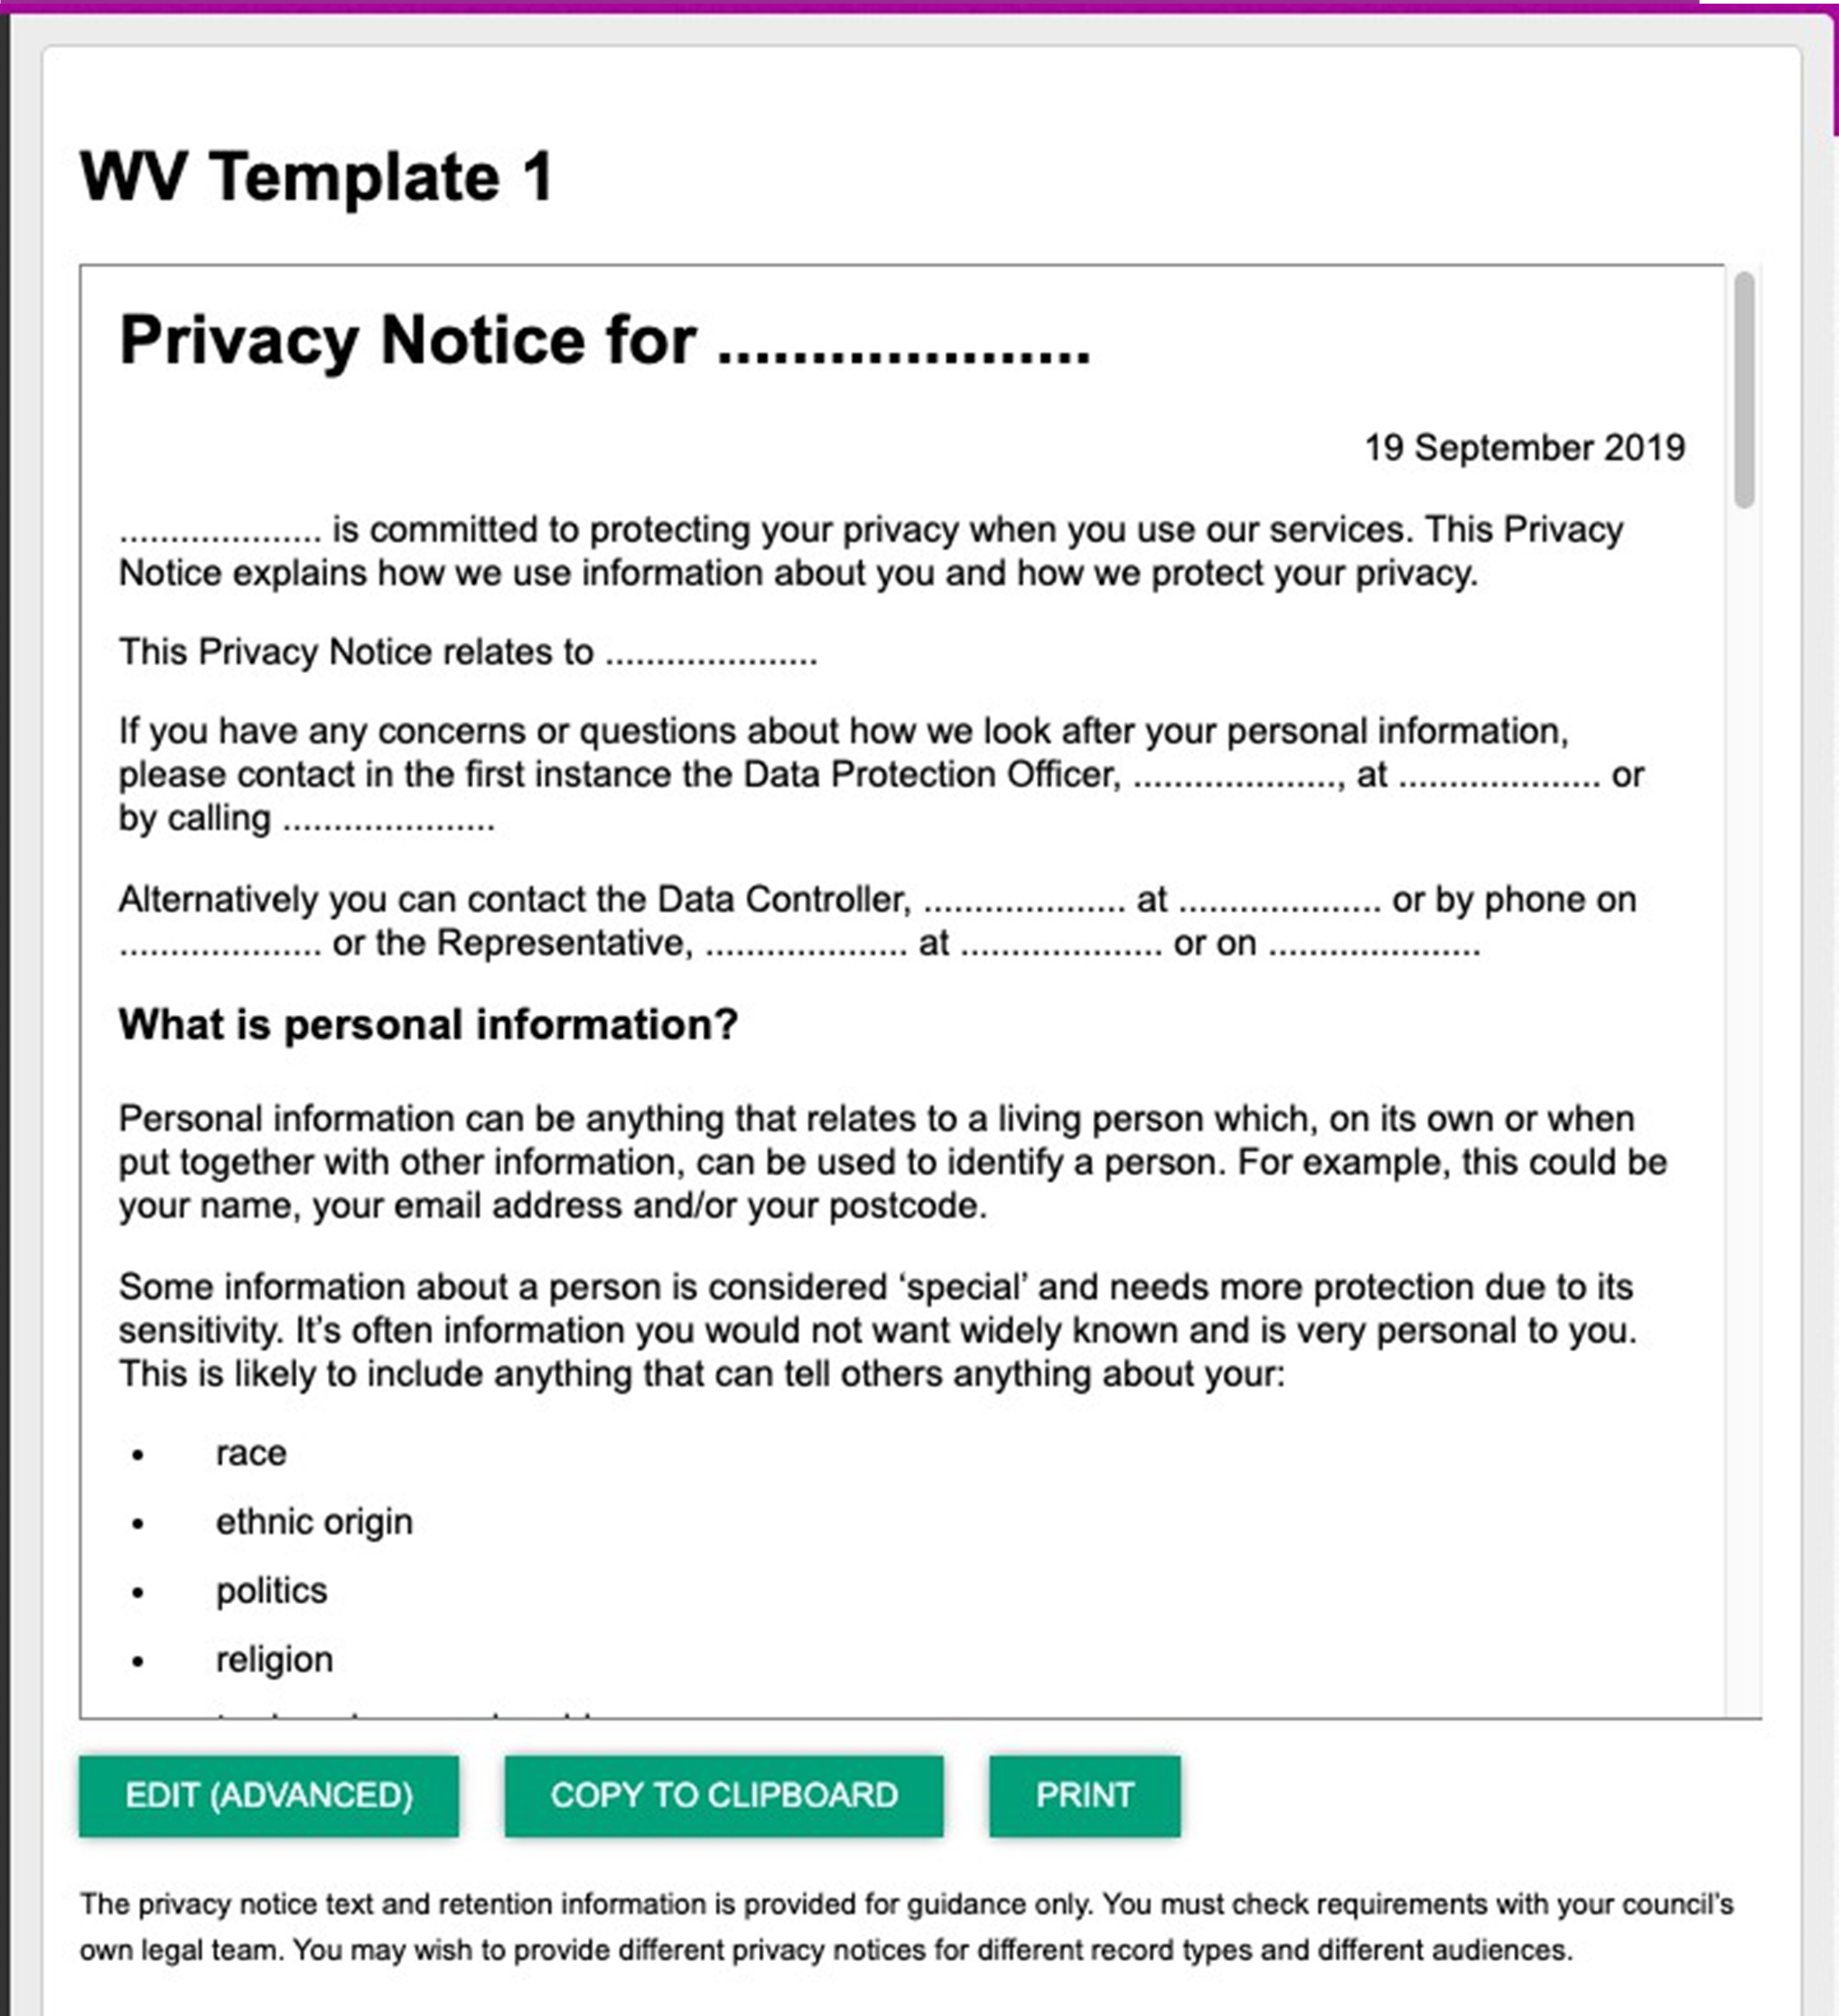
The template above is the default template. Note that where a row of dots is displayed this is information which will be completed with the relevant RoPA details when you generate a privacy notice for a RoPA record.
To edit the template click on the EDIT (ADVANCED) button. Edit the HTML as required and click on the ‘SAVE’ option to save your new template.
There are also options to copy the template to your clipboard which could be used to edit offline or to print the template so that you can see what it would look like when printed.
10.2) Creating a privacy notice for your RoPA records
Once you have defined your privacy notice templates you can link a template with a set of records in your RoPA to create a privacy notice for the records.
You can do this from the pane on the ‘Privacy notice’ page using the ‘Create privacy notice’ option.
When you click on the option a lightbox is displayed in which you need to choose:
- The template for your privacy notice – from a list of all available
- The RoPA record which will use privacy notice – from a list of all your RoPA records. You can scroll through the list or enter text to find matching records.
Once you have chosen both your template and the RoPA records using the template then click on the ‘CREATE’ button to add the privacy notice.
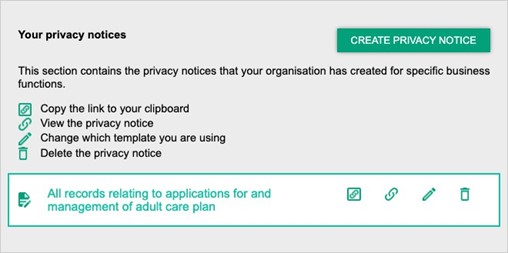
The privacy notice will be added to the list on the page and you will then have options to:
- Copy a link to the privacy notice to your clipboard so that you can use the link elsewhere. For example on a web page where customers can look at the notice online if they wish to know what you are doing with their records
- View the privacy notice in your browser. You may want to do this to check the formatting and information in the privacy notice
- Change the template used for the privacy notice. When you click on the option you see a lightbox in which you can select an alternative template
- Delete the privacy notice. Remove the link between the RoPA record and the privacy notice template. You will be asked to confirm that you wish to delete.
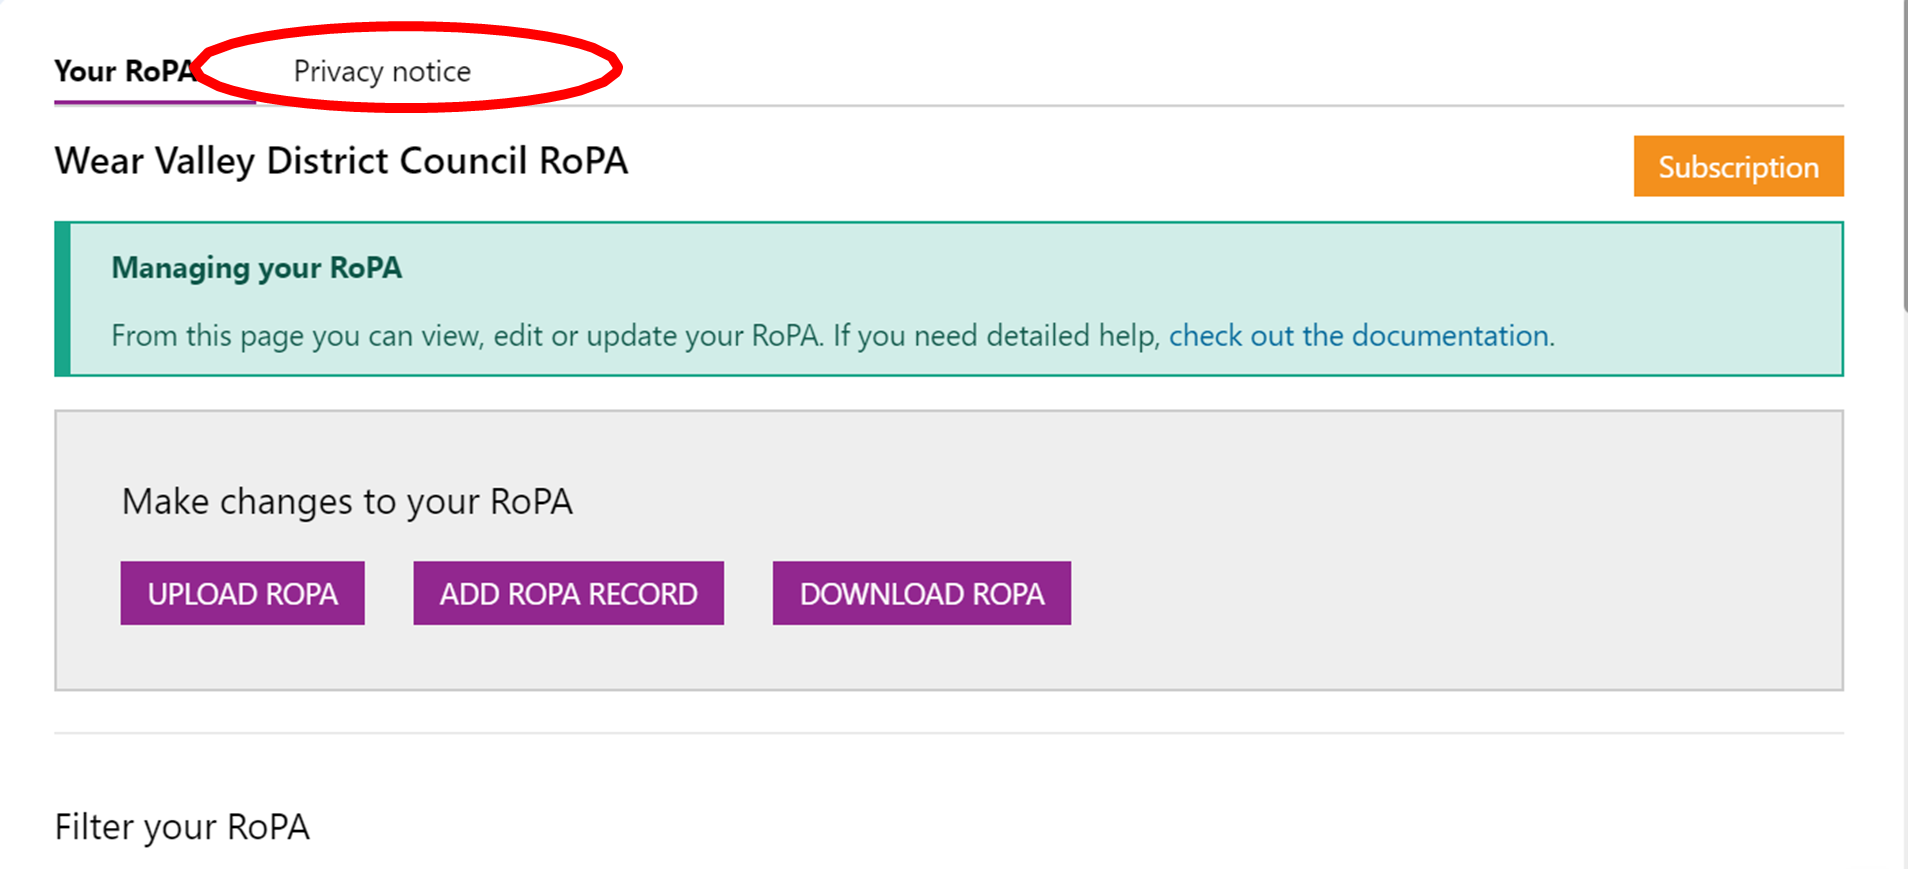
As an alternative way of adding a privacy notice to a RoPA record you can go to the ‘Your RoPA’ page from the menu and then scroll down to the list of RoPA records.
To the right of each RoPA record is a ‘PRIVACY NOTICE’ button.

If you click on the button you will see 3 options:
- Create – to link the RoPA record with a privacy notice template
- View – to view the privacy notice in your browser
- Copy link – to copy the link to the privacy notice to the clipboard so that you can use the link elsewhere
The view and copy links are disabled until you have used create to link your RoPA record with a privacy notice template. The create option is disabled once you have added a privacy notice for the RoPA record.
This may be the preferred way of adding privacy notices once your RoPA has a larger number of records.
Back to top
11) Need more help?
We hope you found the introduction to the IAR and RoPA tool useful, but if you have any further questions or would like to learn more, please get in touch.
Use the Help link in the navigation bar anywhere in LG Inform Plus to read through our online help guides, or send an email to support@esd.org.uk and the support team will get back to you (Monday – Friday, 9 a.m. to 5.30 p.m.).
Back to top