Select the “upload metric values” tab on the left side of the screen, then use the “template builder” to create yourself a template. This will ask you to pick the metric type you wish to upload values for, and then the areas and time periods you have data for. You can add multiple areas types and time periods if you need to.
Once you have completed the template wizard, download the template CSV file and open it in Excel (or equivalent). Fill in the value column with the relevant value for the time period/area of each row, then upload it via the ‘My Local Metrics’ tool. You will receive an email when your upload has been processed informing you that your data was added to the system, or, if the upload has failed, the email will list any errors. For further assistance, please contact support@lginform.local.gov.uk.
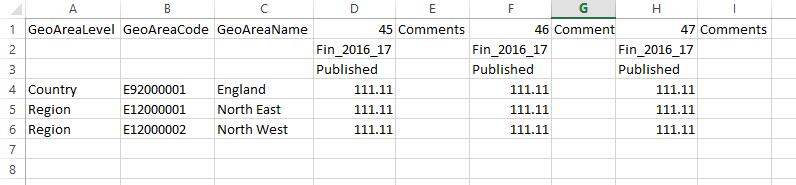
If you have a large number of values to upload, you can put them into the format pictured below, which allows you to import a larger number of values more quickly.
The required columns are as follows:
- GeoAreaLevel - Area type name, found in the dropdown on the ‘Upload metric values’ page.
- GeoAreaCode and GeoAreaName - these can be found in the AreaCode and AreaLabel columns in the regular template.
For each metric you want to add data for, you then need to add the following three columns:
- As pictured above, three stacked rows containing the metric ID (found under MetricTypeID in the regular template), the time period identifier (found under TimePeriod in the regular template) and the word ‘Published’.
- Comments - the same as the corresponding field in the regular template.
This may take a little longer to set up, but if you have several local metric values to update, it will allow you to add data much more efficiently.